

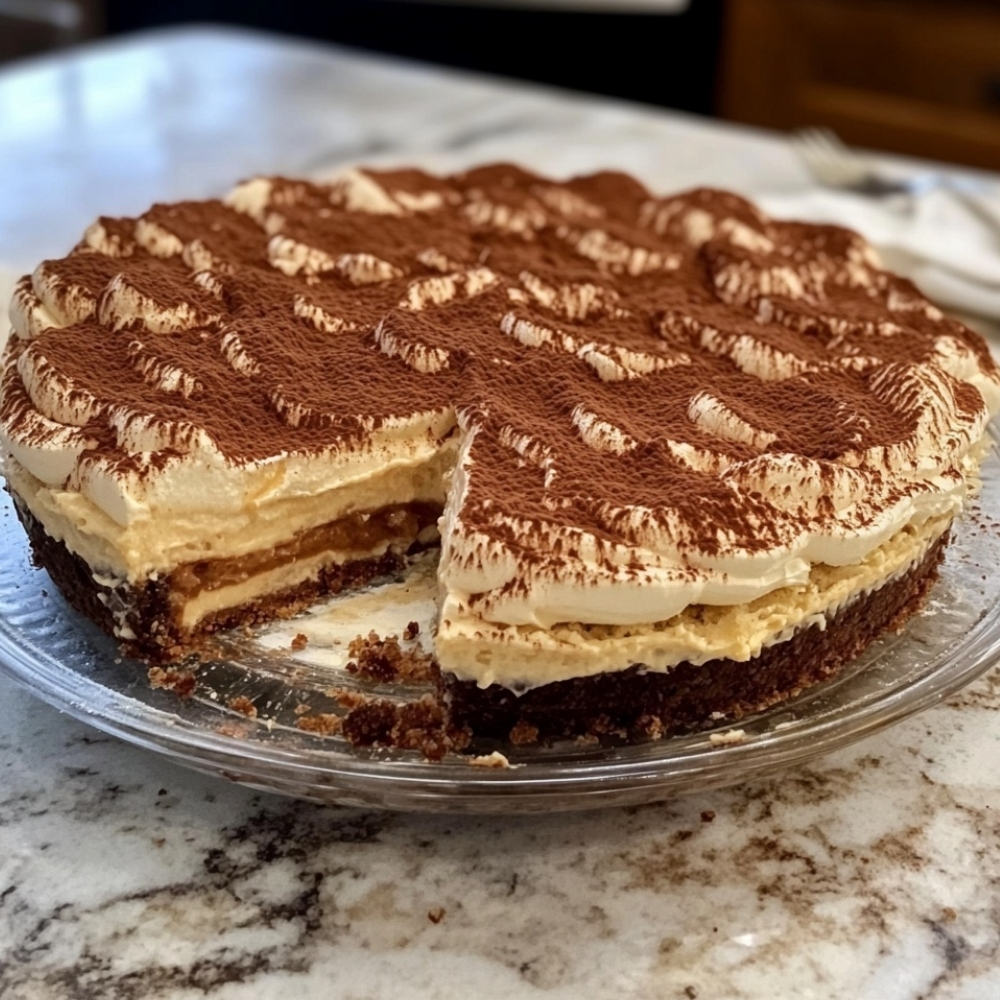
This No-Bake Tiramisu Pie takes everything you love about classic tiramisu—coffee, mascarpone cream, cocoa—and turns it into an easy, sliceable pie. You get a buttery cookie crust, light and silky mascarpone filling, and a cocoa-dusted top with hints of espresso and vanilla.
It looks elegant, sets beautifully in the fridge, and slices like a dream—no oven and no eggs required. Perfect for holidays, dinner parties, date night, or when you want a fancy-tasting dessert with surprisingly little effort.
Why You’ll Love This No-Bake Tiramisu Pie
- No oven, no fuss – The fridge does the work; perfect for warm days or busy schedules.
- Creamy & light – Whipped mascarpone filling that’s rich but not heavy.
- Classic tiramisu vibes – Coffee, cream, cocoa, and a hint of liqueur (optional).
- Beautiful slices – Sets firm enough to cut into neat wedges.
- Make-ahead dessert – Best when chilled for hours or overnight.
Ingredients
For the No-Bake Crust
- 250 g (about 2 cups) crushed ladyfinger cookies or graham crackers / vanilla cookies
- 90 g (6 tbsp) unsalted butter, melted
- 2–3 tbsp granulated sugar (optional, depending on sweetness of cookies)
- Pinch of salt
For the Coffee Soak
- 120 ml (1/2 cup) strong brewed coffee or espresso, cooled
- 1–2 tbsp coffee liqueur (like Kahlúa or Marsala), optional
- 1–2 tbsp sugar, to taste (optional, if you like it sweeter)
For the Mascarpone Filling
- 450 g (16 oz) mascarpone cheese, chilled but soft enough to mix
- 240 ml (1 cup) cold heavy cream
- 100–120 g (1/2–2/3 cup) powdered sugar, sifted
- 1–2 tsp vanilla extract
- Pinch of salt
For Topping
- Unsweetened cocoa powder, for dusting
- Dark chocolate shavings or curls (optional)
- Extra whipped cream (optional, for serving)
Instructions
1) Make the crust
In a bowl, stir together crushed ladyfingers (or other cookies), melted butter, sugar (if using), and a pinch of salt until the mixture feels like damp sand and holds together when pressed.
Press the mixture firmly into the bottom and up the sides of a 9-inch (23 cm) pie dish. Use the bottom of a glass or measuring cup to compact it well.
Refrigerate the crust for 20–30 minutes while you prepare the filling.
Tip: A well-packed crust holds together better when sliced.
2) Mix the coffee soak
In a small bowl, combine cooled coffee or espresso with coffee liqueur (if using). Taste and add a little sugar if you prefer a sweeter coffee flavor.
Set aside—you’ll lightly brush or drizzle this over part of the crust and some crumbs for that tiramisu taste without making the crust soggy.
3) Whip the mascarpone filling
In a large mixing bowl, add mascarpone, powdered sugar, vanilla, and a pinch of salt. Beat on low to medium speed until smooth and creamy, about 30–45 seconds. Don’t overbeat mascarpone or it can become grainy.
In a separate bowl, whip the cold heavy cream to medium-stiff peaks.
Gently fold the whipped cream into the mascarpone mixture in 2–3 additions until fully combined, light, and smooth.
Tip: Keep everything as cold as possible for a stable, fluffy filling.
4) Add coffee flavor without sogginess
Lightly brush or drizzle 2–3 tbsp of the coffee mixture over the bottom of the chilled crust. Don’t soak it; just enough to perfume the base.
If you like more texture, sprinkle a thin layer of extra crushed ladyfingers or cookie crumbs over the coffee-brushed crust and lightly drizzle another spoonful of coffee over them—this mimics coffee-soaked layers but stays pie-friendly.
5) Fill the pie and level the top
Spoon the mascarpone filling into the crust and spread it into an even layer using an offset spatula or the back of a spoon.
Smooth the top as neatly as you like—this will be your “tiramisu” surface for cocoa and chocolate.
6) Chill until set
Cover the pie loosely with plastic wrap or foil (avoid touching the surface) and refrigerate for at least 4 hours, preferably overnight, until firm enough to slice cleanly.
Tip: Longer chilling = cleaner slices and deeper flavor.
7) Finish and serve
Just before serving, dust the top generously with unsweetened cocoa powder using a fine sieve.
If desired, add chocolate shavings/curls or a ring of piped whipped cream around the edge.
Slice with a sharp knife, wiping the blade between cuts for neat wedges. Serve chilled.
Serving Suggestions
- Serve slices with a small dollop of lightly sweetened whipped cream.
- Add a few chocolate-covered espresso beans on each slice for crunch.
- Pair with espresso, cappuccino, or dessert wine.
- Decorate with ladyfinger halves poked into the edge for a classic tiramisu look.
Cook’s Tips
- Use real mascarpone: It gives the authentic creamy, slightly tangy tiramisu flavor.
- Don’t overbeat mascarpone: Overmixing can cause it to break; mix just until smooth.
- Chill fully: Under-chilled pie will be too soft and messy to slice.
- Adjust coffee strength: For a milder flavor, use milder coffee; for bold tiramisu flavor, use strong espresso.
Variations & Add-Ins
- Chocolate tiramisu pie: Add a thin layer of melted dark chocolate over the crust before adding filling (let it set first).
- Nutty twist: Sprinkle finely chopped toasted hazelnuts or almonds between the crust and filling.
- Extra coffee kick: Fold in 1–2 tsp instant espresso powder dissolved in 1 tbsp cream into the mascarpone mixture.
- Mini pies: Use small tart pans or a muffin tin with liners to create individual tiramisu pies.
- Lighter version: Swap part of the mascarpone with full-fat cream cheese or Greek yogurt (texture and flavor will change slightly).
Storage & FAQ
- Storage: Keep covered in the fridge for up to 3–4 days. The crust may soften slightly over time but the flavor deepens.
- Freezing: Freeze the whole pie (without cocoa dusting) until firm, wrap well, and store for up to 1 month. Thaw in the fridge overnight, then dust with cocoa before serving.
- Watery filling? Make sure cream is whipped to firm peaks and mascarpone is not overmixed. Always chill long enough.
- Can I use cream cheese instead? You can replace some mascarpone with cream cheese, but the flavor will be less classic tiramisu and more cheesecake-like.
- No ladyfingers? Use graham crackers, digestive biscuits, or vanilla cookies and lean more on the coffee in the filling/topping.
No-Bake Tiramisu Pie gives you all the coffee, cream, and cocoa magic of classic tiramisu in a simple, make-ahead pie: buttery crust, silky mascarpone filling, and a cocoa-dusted top that slices clean and looks gorgeous on the table.
No-Bake Tiramisu Pie – Silky, Coffee-Kissed & So Simple
A creamy, no-bake Tiramisu Pie with a cookie crumb crust, light mascarpone filling, and coffee-cocoa flavor. All the taste of classic tiramisu in an easy, sliceable, make-ahead dessert—no oven, no eggs.
Ingredients
- For the Crust:
- 250 g (about 2 cups) crushed ladyfinger cookies, graham crackers, or vanilla cookies
- 90 g (6 tbsp) unsalted butter, melted
- 2–3 tbsp granulated sugar (optional, to taste)
- Pinch of salt
- For the Coffee Soak:
- 120 ml (1/2 cup) strong brewed coffee or espresso, cooled
- 1–2 tbsp coffee liqueur (optional)
- 1–2 tbsp sugar, to taste (optional)
- For the Mascarpone Filling:
- 450 g (16 oz) mascarpone cheese
- 240 ml (1 cup) cold heavy cream
- 100–120 g (1/2–2/3 cup) powdered sugar, sifted
- 1–2 tsp vanilla extract
- Pinch of salt
- For Topping:
- Unsweetened cocoa powder, for dusting
- Dark chocolate shavings or curls (optional)
- Extra whipped cream (optional)
Instructions
- 1. Make the crust
- 2. In a bowl, combine crushed cookies, melted butter, sugar (if using), and a pinch of salt.
- 3. Mix until the crumbs are evenly moistened and hold together when pressed.
- 4. Press firmly into the bottom and up the sides of a 9-inch (23 cm) pie dish.
- 5. Refrigerate for 20–30 minutes to set.
- 6. Prepare the coffee soak
- 7. In a small bowl, mix cooled coffee or espresso with coffee liqueur, if using.
- 8. Taste and add sugar if you prefer a sweeter soak. Set aside.
- 9. Make the mascarpone filling
- 10. In a large bowl, beat mascarpone, powdered sugar, vanilla, and a pinch of salt on low–medium speed until smooth and creamy (about 30–45 seconds).
- 11. In a separate bowl, whip the cold heavy cream to medium-stiff peaks.
- 12. Gently fold the whipped cream into the mascarpone mixture in 2–3 additions until fully combined and fluffy.
- 13. Add coffee to the crust
- 14. Lightly brush or drizzle 2–3 tbsp of the coffee mixture over the bottom of the chilled crust.
- 15. Optionally, sprinkle a thin layer of extra cookie crumbs and lightly drizzle another spoonful of coffee over them to mimic tiramisu layers.
- 16. Fill the pie
- 17. Spoon the mascarpone filling into the crust and spread into an even layer, smoothing the top.
- 18. Chill
- 19. Cover loosely and refrigerate for at least 4–6 hours, or overnight, until the pie is firm and sliceable.
- 20. Finish and serve
- 21. Just before serving, dust the top generously with unsweetened cocoa powder.
- 22. Add chocolate shavings or whipped cream, if desired.
- 23. Slice with a sharp knife, wiping between cuts, and serve chilled.
Notes
For the most authentic tiramisu flavor, use ladyfingers in the crust and strong espresso in the soak.
Don’t overbeat mascarpone—overmixing can cause it to separate or become grainy.
If the crust feels too dry, add an extra 1–2 tbsp melted butter; if too wet, add a bit more crumbs.
For a stronger coffee flavor, drizzle a little extra coffee soak over each slice just before serving.
Nutrition
Calories: ~330–380
Protein: ~5–6 g
Total Fat: ~24–28 g
Carbohydrates: ~25–30 g
Fiber: ~0–1 g