Craving something warm, cheesy, and utterly satisfying? These Weight Watchers Garlic Butter Cheese Bombs are the perfect indulgence that won’t derail your healthy eating goals. With a soft, golden exterior, gooey cheese center, and a burst of garlic-butter flavor, these bombs are ideal as a snack, appetizer, or side dish.
Why You’ll Love This Recipe
Weight Watchers Friendly: Enjoy cheesy goodness without guilt.
Quick and Easy: Made with simple ingredients in under 30 minutes.
Versatile: Great for parties, game nights, or an everyday treat.
2 oz reduced-fat mozzarella cheese, cut into 8 cubes
2 tablespoons light butter, melted
2 cloves garlic, minced
1 teaspoon dried parsley (or fresh, chopped)
Non-stick cooking spray
Optional: pinch of grated Parmesan cheese for garnish
Instructions
Preheat the Oven: Set your oven to 375°F (190°C). Line a baking sheet with parchment paper or lightly spray it with non-stick cooking spray.
Prepare the Dough: Separate the biscuit dough into 8 pieces. Flatten each piece into a small circle, about 3 inches in diameter.
Add the Cheese: Place a cube of mozzarella cheese in the center of each dough circle. Fold the edges of the dough over the cheese and pinch to seal tightly, forming a ball.
Arrange on Baking Sheet: Place the cheese-filled dough balls seam-side down on the prepared baking sheet.
Make the Garlic Butter: In a small bowl, mix the melted butter, minced garlic, and parsley. Brush the mixture generously over each dough ball.
Bake: Place the baking sheet in the oven and bake for 12-15 minutes, or until the bombs are golden brown.
Garnish and Serve: Optional—sprinkle a pinch of grated Parmesan cheese over the top for added flavor. Serve warm and enjoy the cheesy, garlicky goodness!
Tips for Success
Seal the Dough Well: Ensure the dough is sealed tightly around the cheese to prevent leaks while baking.
Experiment with Cheese: Try reduced-fat cheddar, pepper jack, or even a mix of cheeses for variety.
Serve Immediately: These bombs are best enjoyed warm while the cheese is gooey and melty.
Make It Fancy: Add a sprinkle of Italian seasoning for extra flair.
Nutritional Information (Per Serving)
Servings: 8
Calories: ~110
Weight Watchers Points: ~3 (may vary based on plan and ingredients used)
Why These Garlic Butter Cheese Bombs Are a Must-Try
These Weight Watchers Garlic Butter Cheese Bombs combine comfort food indulgence with smart ingredient choices, making them a go-to recipe for any occasion. Whether you’re hosting a gathering or looking for a quick snack to satisfy your cravings, these cheesy delights deliver all the flavor without the extra points. Try them today—you won’t regret it!
Indulge in a slice of heaven without straying from your health goals! This Weight Watchers Heavenly No-Bake Banana Split Cheesecake offers all the flavors of the classic dessert—creamy cheesecake, fresh bananas, and a hint of chocolate—in a lightened-up version. Perfect for summer gatherings or whenever you’re craving a refreshing treat, this no-bake dessert is as easy to make as it is to enjoy.
Why You’ll Love This Recipe
Weight Watchers Friendly: A low-point dessert that fits your plan.
No-Bake Simplicity: No need to heat up the kitchen!
Crowd-Pleaser: Loved by kids and adults alike.
Customizable: Add your favorite toppings to make it your own.
Ingredients
For the Crust:
1 cup low-fat graham cracker crumbs
2 tablespoons light butter, melted
For the Filling:
8 oz fat-free cream cheese, softened
1 cup fat-free Greek yogurt
1/3 cup sugar substitute (like Stevia or Monk Fruit)
1 teaspoon vanilla extract
1 medium banana, mashed
For the Toppings:
1 medium banana, sliced
1/4 cup crushed pineapple (drained)
2 tablespoons sugar-free chocolate syrup
2 tablespoons fat-free whipped topping
Optional: chopped nuts or maraschino cherries for garnish
Instructions
Prepare the Crust: In a medium bowl, mix the graham cracker crumbs and melted butter until well combined. Press the mixture evenly into the bottom of an 8×8-inch square pan or a springform pan. Place in the refrigerator to set while you prepare the filling.
Make the Filling: In a large bowl, beat the cream cheese, Greek yogurt, sugar substitute, and vanilla extract until smooth and creamy. Gently fold in the mashed banana until fully incorporated.
Assemble the Cheesecake: Spread the filling evenly over the prepared crust. Smooth the top with a spatula.
Chill: Cover the pan with plastic wrap and refrigerate for at least 4 hours or overnight to allow the cheesecake to set.
Add the Toppings: Before serving, layer the sliced bananas and crushed pineapple over the cheesecake. Drizzle with sugar-free chocolate syrup and add a dollop of whipped topping. Garnish with chopped nuts or a cherry if desired.
Serve and Enjoy: Slice into 9 equal pieces and serve chilled.
Tips for Success
Use Ripe Bananas: The natural sweetness of ripe bananas enhances the flavor.
Chill Time is Key: Ensure the cheesecake has enough time to set for the best texture.
Customize the Crust: Swap graham crackers for crushed vanilla wafers or digestive biscuits for variety.
Topping Options: Feel free to experiment with strawberries, blueberries, or sugar-free caramel sauce.
Nutritional Information (Per Serving)
Servings: 9
Calories: ~120
Weight Watchers Points: ~3 (varies based on plan and ingredients)
Why This Recipe Works
This no-bake banana split cheesecake combines the nostalgia of a classic banana split with the creamy richness of cheesecake—all in a healthier package. It’s easy to make, packed with flavor, and perfect for any occasion. Give this recipe a try, and you’ll have a new favorite dessert that doesn’t compromise your goals!
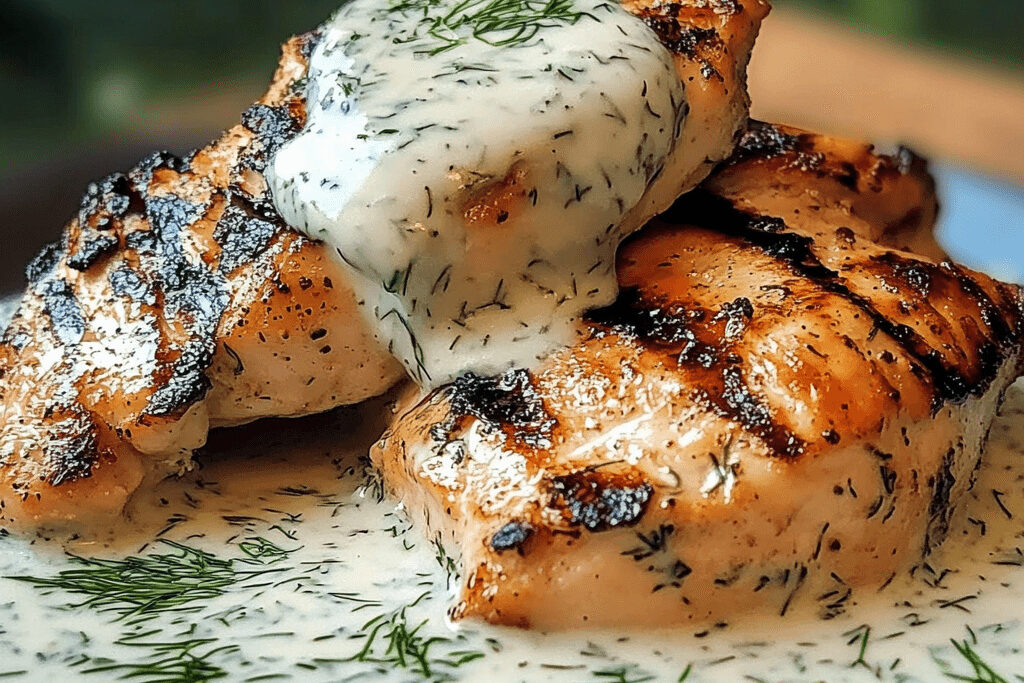
If you’re looking for a quick, healthy, and incredibly flavorful meal, Grilled Chicken with Creamy Dill Sauce is the perfect choice. This dish combines tender, juicy grilled chicken with a rich and tangy creamy dill sauce, creating a balance of flavors that’s both refreshing and satisfying. What makes this recipe truly special is its simplicity—it’s easy to prepare, and the ingredients are fresh and wholesome. The grilled chicken provides a lean source of protein, while the creamy dill sauce, made with Greek yogurt or sour cream, adds a deliciously smooth texture with a hint of zest from the dill and lemon. Whether you’re cooking for a busy weeknight or preparing a casual weekend dinner, this recipe is sure to impress with minimal effort and maximum taste.
Why Grilled Chicken with Creamy Dill Sauce is a Perfect Meal
Simple and Quick This Grilled Chicken with Creamy Dill Sauce is the ideal meal when you’re short on time but still want something flavorful and satisfying. The recipe comes together in under 30 minutes, making it perfect for busy weeknights or casual dinners. The chicken grills quickly, and the creamy dill sauce can be whipped up in just a few minutes, allowing you to enjoy a delicious meal without spending hours in the kitchen.
Healthy Option Grilled chicken is a lean, high-protein choice that makes this dish a healthy option for any diet. It’s low in fat and rich in essential nutrients, helping to support muscle growth and overall health. Paired with the creamy dill sauce, which can be made with Greek yogurt or sour cream for a lighter version, this dish stays refreshing and light. Plus, it’s a great choice for anyone following low-carb or keto diets, as the combination of protein and healthy fats keeps you satisfied without loading up on carbs.
Versatility One of the best things about Grilled Chicken with Creamy Dill Sauce is how well it pairs with a variety of side dishes. You can serve it alongside a fresh cucumber salad for a cool and crisp contrast, or enjoy it with roasted vegetables for a hearty, nutritious addition. If you’re craving something more substantial, a serving of rice or quinoa makes a perfect base. This dish can easily be customized to suit your tastes or whatever ingredients you have on hand, making it a versatile choice for any occasion.
Key Ingredients for Grilled Chicken with Creamy Dill Sauce
Fresh Chicken For this recipe, grilled chicken breast works best as it’s lean, tender, and cooks quickly on the grill. The mild flavor of chicken breast pairs perfectly with the zesty and creamy dill sauce, allowing the sauce to shine without overpowering the chicken. Grilling the chicken ensures a deliciously smoky, slightly charred exterior while keeping the inside juicy and full of flavor. It’s a healthy protein choice that complements the light, fresh nature of the dish.
Fresh Dill and Lemon The key to the creamy dill sauce is the combination of fresh dill and lemon. Dill adds a unique, aromatic flavor that’s both slightly sweet and tangy, making it the perfect herb for chicken. The lemon brightens the sauce, adding a refreshing citrus note that balances the richness of the creamy base. Together, these ingredients create a lively, flavorful sauce that enhances the grilled chicken without overwhelming it.
Greek Yogurt or Sour Cream The base of the creamy dill sauce can be made with either Greek yogurt or sour cream, but Greek yogurt is the healthier option. Greek yogurt provides a creamy, thick texture while being lower in fat and higher in protein compared to sour cream. It also offers a subtle tang that complements the dill and lemon perfectly. For a lighter version, Greek yogurt is a great choice, giving you the richness you crave without the added calories and fat of traditional cream-based sauces.
Olive Oil and Seasonings To marinate the chicken and bring out its flavor, olive oil is essential. Olive oil not only helps the chicken cook evenly on the grill but also adds a subtle richness that enhances the overall taste. When paired with seasonings like garlic, salt, pepper, and a touch of smoked paprika or cumin, the olive oil creates a flavorful coating that helps lock in moisture and infuse the chicken with taste. These simple seasonings complement the fresh dill sauce, creating a balanced and delicious dish.
How to Make the Best Grilled Chicken with Creamy Dill Sauce
Prepare the Chicken To start, marinate the chicken to ensure it’s flavorful and juicy. Begin by placing your chicken breasts in a bowl or resealable bag. Add olive oil, garlic, salt, pepper, and any other seasonings you prefer, such as smoked paprika, lemon zest, or cumin. The olive oil helps the chicken stay moist while grilling, and the seasonings will create a delicious crust when it’s cooked. For best results, let the chicken marinate for at least 15-30 minutes, or up to a few hours if you have time. The longer it marinates, the more the flavors will develop.
Grill the Chicken Next, heat your grill to medium-high heat (about 375-400°F or 190-200°C). Place the marinated chicken breasts on the grill and cook for about 6-7 minutes on each side, depending on the thickness of the chicken. For even grilling, avoid moving the chicken too much. To ensure the chicken is fully cooked, use a meat thermometer—the internal temperature should reach 165°F (75°C). Once done, remove the chicken from the grill and let it rest for a few minutes. Resting helps the juices redistribute inside the meat, keeping it tender and juicy.
Make the Creamy Dill Sauce While the chicken is grilling, it’s the perfect time to prepare the creamy dill sauce. In a bowl, combine Greek yogurt (or sour cream if you prefer) with fresh dill, lemon juice, lemon zest, and a pinch of salt and pepper. Stir well to blend the flavors, and taste the sauce to adjust the seasoning as needed. If you prefer a thinner sauce, add a splash of water or extra lemon juice. For added creaminess, you can mix in a teaspoon of olive oil or a dash of garlic powder. The key is to balance the tangy freshness of the dill and lemon with the smooth richness of the yogurt.
Assemble the Dish To serve, place the grilled chicken breasts on a platter or individual plates. Spoon a generous amount of the creamy dill sauce over the chicken, or serve the sauce on the side for dipping. Garnish with extra fresh dill, lemon slices, or even a sprinkle of black pepper for added flavor. This dish pairs beautifully with a side of cucumber salad, roasted vegetables, or a light rice pilaf. The vibrant green of the dill sauce and the golden grill marks on the chicken make for an appealing, well-balanced presentation. Enjoy!
Tips for Perfect Grilled Chicken Every Time
Marinate for Flavor Marinating the chicken is key to infusing it with flavor and ensuring it stays moist during grilling. For the best results, marinate your chicken for at least 15-30 minutes, but for even more depth of flavor, aim for 2-3 hours. If you have time, marinating overnight allows the seasonings to penetrate the meat more thoroughly, making it more tender and flavorful. The longer you marinate, the better the flavors meld, but even a short marinade will make a noticeable difference in taste.
Grill Temperature and Timing To get perfectly grilled chicken, you need to maintain the right grill temperature. Preheat your grill to medium-high heat, around 375-400°F (190-200°C). If the grill is too hot, the chicken can burn on the outside while remaining raw on the inside; too low, and the chicken will dry out. Grill the chicken for about 6-7 minutes per side, depending on the thickness of the breast. Thicker pieces may require a few extra minutes. Keep an eye on the chicken, and be ready to adjust the heat if necessary to ensure an even cook.
Using a Meat Thermometer A meat thermometer is the best way to ensure your chicken is cooked to perfection. The internal temperature should reach 165°F (75°C) to be safe for consumption and to guarantee it’s fully cooked. Using a thermometer takes the guesswork out of grilling, preventing undercooked chicken or dry, overcooked meat. Insert the thermometer into the thickest part of the chicken breast to check the temperature.
Rest the Chicken Once your chicken is off the grill, don’t skip the resting step! Let the grilled chicken sit for 5-10 minutes before serving. This allows the juices inside the chicken to redistribute, ensuring that the meat stays tender and juicy. Cutting into the chicken immediately after grilling will cause the juices to escape, leading to dry, less flavorful meat. Allowing it to rest results in a much more enjoyable eating experience.
Delicious Side Dishes to Pair with Grilled Chicken and Creamy Dill Sauce
Cucumber Salad A cucumber salad is a perfect side to pair with Grilled Chicken and Creamy Dill Sauce. The crisp, refreshing crunch of cucumber complements the rich and tangy flavors of the dill sauce. You can enhance the salad with a light dressing of lemon juice, olive oil, and a sprinkle of fresh herbs like dill or parsley for extra freshness. This cool and vibrant salad balances the warmth of the grilled chicken and adds a refreshing contrast to the creamy sauce.
Roasted Vegetables Roasted vegetables are another excellent pairing for this dish. The caramelized flavors from roasting enhance vegetables like zucchini, bell peppers, and carrots, providing a savory, earthy contrast to the creamy and tangy chicken. The slight char from the roasting process adds depth to the dish, and the natural sweetness of the vegetables pairs wonderfully with the zesty dill sauce. Roasting also brings out the full flavor of the vegetables without overpowering the chicken.
Rice or Quinoa For a light yet hearty side, rice or quinoa makes an ideal pairing. Both grains are neutral in flavor and provide a perfect base to soak up the creamy dill sauce. Rice is a classic choice, but quinoa offers a slightly nuttier flavor and a boost of protein, making it an excellent choice for a healthier option. Both options bring balance to the meal, providing a satisfying accompaniment without competing with the flavors of the chicken and sauce.
Garlic Bread If you’re looking for something to complement the creamy sauce in a more indulgent way, garlic bread is a fantastic option. The buttery, garlicky flavor of the bread soaks up the dill sauce beautifully, making every bite even more flavorful. The crisp texture of the garlic bread contrasts nicely with the tender grilled chicken, creating a satisfying and well-rounded meal. It’s the perfect side for anyone who loves a little extra comfort with their meal.
Grilled Chicken with Creamy Dill Sauce is the perfect meal for anyone looking for a quick, simple, and healthy option without compromising on flavor. The combination of juicy grilled chicken and tangy, creamy dill sauce makes for a satisfying dish that’s both light and delicious. Whether you’re cooking for a busy weeknight or a casual gathering, this recipe is easy to make and incredibly versatile, pairing perfectly with a variety of sides.
We encourage you to give this recipe a try and experiment with your own variations—maybe you prefer a bit more lemon or want to add a dash of garlic to the sauce. Whatever you choose, we’d love to hear about your results! Share your thoughts and any creative twists in the comments below. Happy cooking!
If you’re looking for a quick and flavorful dinner that’s both satisfying and easy to make, the Cheesy Ground Beef Delight Wrap with Creamy Sauce is the perfect choice. This dish brings together savory ground beef, melty cheese, and a rich creamy sauce, all wrapped in a soft tortilla. It’s an ideal meal for busy weeknights when you want something delicious without spending hours in the kitchen. Plus, it’s perfect for meal prep, allowing you to enjoy a homemade, comforting dish anytime. In just 30 minutes, you can have this mouthwatering wrap ready to serve—combining ease, flavor, and a family-friendly appeal that everyone will love.
Why Choose a Ground Beef Wrap for Dinner?
Quick and Easy Meal: One of the biggest advantages of making a ground beef wrap is how fast and simple it is to prepare. In under 30 minutes, you can have a flavorful and satisfying meal on the table. The ground beef cooks quickly, and with minimal prep time, you can have all the ingredients ready to go. Whether you’re short on time or just don’t feel like spending hours in the kitchen, this dish is a perfect choice for a speedy dinner.
Versatile and Customizable: Ground beef wraps are incredibly versatile, allowing you to get creative with the toppings and fillings. You can add fresh vegetables like lettuce, tomatoes, or peppers for extra crunch, or swap the creamy sauce for a tangy BBQ sauce for a different twist. Want to spice it up? Add jalapeños or hot sauce for some heat. The possibilities are endless, making it easy to adapt the recipe to your taste or dietary preferences.
Family-Friendly: This recipe is a hit with both kids and adults, making it an excellent choice for family meals. The combination of savory ground beef, gooey cheese, and a creamy sauce is a flavor that everyone can enjoy. Plus, since the wraps are easy to hold and eat, they’re perfect for even the pickiest eaters. Whether you’re feeding a family of four or prepping for a casual get-together, ground beef wraps are sure to please everyone at the table.
Ingredients for Cheesy Ground Beef Delight Wrap with Creamy Sauce
Ground Beef: Ground beef is the star of this wrap, and for good reason. It’s an affordable protein that cooks quickly, making it perfect for a fast, weeknight meal. The rich, savory flavor of the beef pairs wonderfully with the creamy sauce and cheese, creating a satisfying and hearty filling. Whether you choose lean or regular ground beef, it adds the right amount of flavor and texture to the wrap, ensuring each bite is delicious.
Cheese and Tortillas: Cheese and tortillas are key elements in making this wrap cheesy, hearty, and filling. The cheese melts perfectly over the warm ground beef, creating a gooey and flavorful experience in every bite. You can use a variety of cheeses, such as cheddar, Monterey Jack, or a blend of both, depending on your preference. The tortillas serve as the perfect vessel for all the ingredients, holding everything together and providing a soft, slightly chewy texture that complements the richness of the beef and cheese.
Creamy Sauce: The creamy sauce is what elevates this wrap to the next level. Made with ingredients like sour cream, ranch dressing, and a touch of garlic or lime juice, the sauce adds a tangy and creamy richness that balances the savory beef and melted cheese. The sauce not only enhances the flavor but also helps to keep the wrap moist and delicious. You can even experiment by adding a little bit of hot sauce or herbs to customize the flavor of the sauce to your liking.
Optional Add-ins: While the classic version of this wrap is already packed with flavor, you can easily customize it by adding extra ingredients. Salsa, guacamole, or fresh diced tomatoes add a burst of freshness and flavor, while crispy onions or bell peppers can provide a nice crunch. If you prefer a bit of spice, jalapeños or a sprinkle of chili powder can give the wrap an extra kick. These add-ins allow you to create a wrap that suits your taste and dietary preferences, making it as unique as you like.
How to Make the Perfect Cheesy Ground Beef Wrap
Step 1 – Cook the Ground Beef: Start by heating a skillet over medium heat. Add the ground beef and cook, breaking it up with a spatula as it browns. Stir occasionally to ensure it cooks evenly. Once the beef is browned and fully cooked (about 5-7 minutes), drain any excess fat. Next, season the beef with salt, pepper, and your favorite spices. Common options include garlic powder, onion powder, chili powder, or cumin for a bit of heat. Mix the seasoning well to ensure the beef is flavorful and well-coated.
Step 2 – Prepare the Creamy Sauce: While the beef is cooking, prepare the creamy sauce. In a small bowl, combine sour cream, ranch dressing, and a splash of lime juice for a tangy kick. For added flavor, you can stir in a pinch of garlic powder or a few dashes of hot sauce, depending on your taste. If you prefer a thicker sauce, add a bit more sour cream; if you like it more runny, you can thin it with a small amount of milk. Mix the ingredients together until smooth and creamy.
Step 3 – Assemble the Wrap: Once the beef is cooked and the creamy sauce is ready, it’s time to assemble your wraps. Lay a tortilla flat on a clean surface, then add a generous scoop of the cooked ground beef in the center. Sprinkle a good amount of cheese over the beef, allowing it to melt slightly from the heat of the meat. Drizzle a spoonful of the creamy sauce on top of the beef and cheese, and feel free to add any optional toppings like diced tomatoes, onions, or fresh cilantro.
Step 4 – Heat and Serve: To finish, you have two options for heating the wrap. For a crispy, golden wrap, place the assembled tortilla in a heated skillet over medium-low heat. Toast it for about 2-3 minutes on each side, pressing gently with a spatula to ensure it crisps up evenly. Alternatively, if you prefer to serve the wrap cold or don’t want to heat it, simply roll it up and enjoy immediately. To garnish, consider adding a dollop of sour cream, a few sprigs of cilantro, or a sprinkle of chili flakes for extra flavor and color. Serve your cheesy ground beef wrap with a side of salsa, guacamole, or a fresh salad for a complete meal.
Delicious Variations to Try with Your Beef Wrap
Spicy Ground Beef Wrap: If you love a little heat, the Spicy Ground Beef Wrap is the perfect variation. To add a kick, mix finely chopped jalapeños into the ground beef while it cooks, or drizzle your favorite hot sauce over the beef and cheese before wrapping it up. For an extra burst of flavor, you can also sprinkle chili flakes or cayenne pepper into the creamy sauce. This spicy twist will satisfy anyone craving a flavorful, heat-packed meal.
Vegetarian Version: For a vegetarian-friendly option, swap the ground beef with black beans or soy crumbles. Black beans offer a hearty, protein-packed alternative, while soy crumbles mimic the texture of ground beef, making them a great plant-based substitute. Season the beans or soy crumbles with your favorite spices, like cumin and chili powder, to ensure they’re flavorful. Add all the same toppings and creamy sauce for a delicious meatless wrap that’s just as satisfying.
BBQ Beef Wrap: If you’re a fan of tangy BBQ flavors, try the BBQ Beef Wrap variation. Instead of the creamy sauce, swap it out with a rich, smoky BBQ sauce. After cooking the ground beef, stir in a generous amount of BBQ sauce to coat the meat. The sweet and tangy flavors will add a new depth of taste to the wrap, creating a smoky, satisfying meal. You can even add grilled onions or pickles for an extra burst of flavor.
Cheesy Chicken Wrap: For a lighter, yet equally delicious, alternative, try the Cheesy Chicken Wrap by substituting ground beef with shredded chicken. The chicken provides a leaner option while still being packed with protein and flavor. Season the chicken with your favorite spices, or use rotisserie chicken for even quicker prep. The cheese and creamy sauce will still provide that rich, comforting texture, making this version perfect for those looking for a lighter take on the classic wrap.
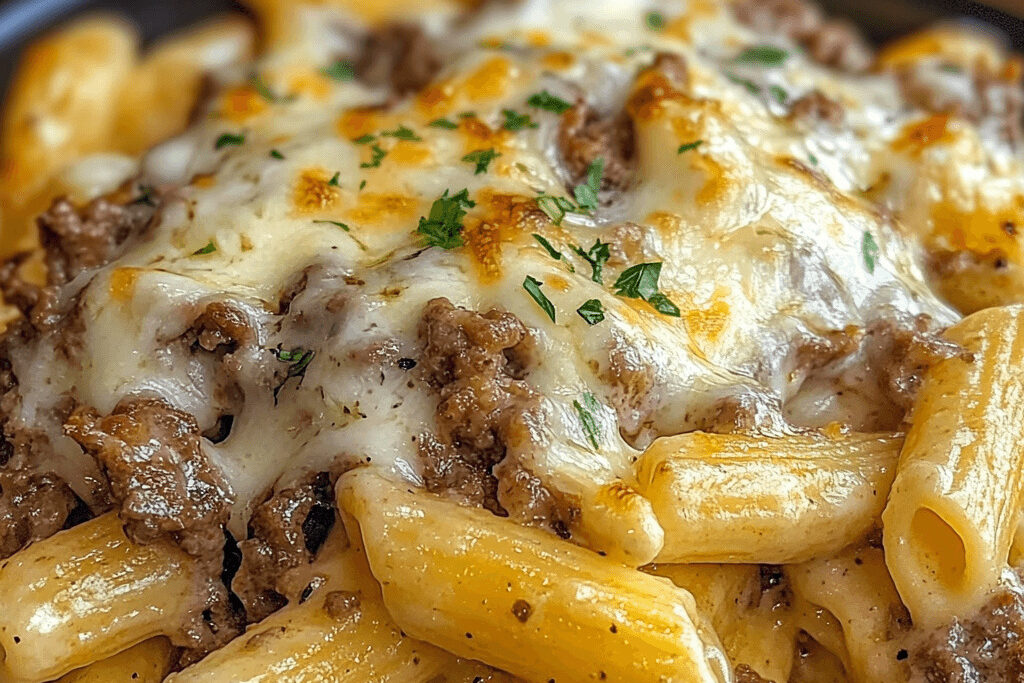
If you’re a fan of the iconic Philly cheesesteak, you’re in for a treat with Philly Cheesesteak Pasta. This mouthwatering dish takes all the beloved flavors of the classic Philly cheesesteak—tender steak, melty cheese, sautéed onions, and peppers—and transforms them into a creamy, hearty pasta dish. The result is a delicious fusion of two comfort food favorites, perfect for those who love a twist on traditional dishes. Whether you’re craving the rich, savory taste of a cheesesteak or looking for a new way to enjoy pasta, Philly Cheesesteak Pasta offers the best of both worlds in one satisfying meal.
What Makes Philly Cheesesteak Pasta So Delicious?
Traditional Philly Cheesesteak Ingredients At the heart of Philly Cheesesteak Pasta are the key ingredients that make the classic Philly cheesesteak so beloved. The dish starts with thinly sliced steak, usually ribeye or flank steak, cooked to perfection to ensure it’s tender and flavorful. The cheese is just as important, with options like American cheese, provolone, or even the classic Cheez Whiz, adding a creamy richness that brings the whole dish together. Onions and bell peppers are typically sautéed to create that familiar savory, slightly caramelized flavor, completing the base of the dish.
Comfort Food Factor Philly Cheesesteak Pasta is the epitome of comfort food. The creamy sauce enveloping the pasta creates a rich, indulgent texture that’s both filling and satisfying. Each bite combines the savory, tender steak with the melt-in-your-mouth cheese, creating the kind of hearty, warm meal you crave after a long day. The combination of flavors and textures—creamy cheese, tender meat, and crisp veggies—gives you the ultimate cozy meal that’s perfect for any occasion.
A New Twist on a Classic Transforming the Philly cheesesteak into a pasta dish takes the classic sandwich to a whole new level. By incorporating pasta, you elevate the dish into something more filling and versatile, while still maintaining all the familiar flavors of the beloved sandwich. The addition of pasta allows for a creamy, cheesy sauce that coats each piece of pasta, making the flavors even more vibrant. This new twist keeps the spirit of the Philly cheesesteak alive, but offers a fresh, satisfying way to enjoy it—perfect for those who want to try something a little different without straying too far from tradition.
How to Make the Perfect Philly Cheesesteak Pasta
Choosing the Right Pasta The right pasta is essential for achieving the perfect Philly Cheesesteak Pasta. You’ll want a pasta shape that can hold up to the rich, creamy sauce while complementing the tender steak and vegetables. Penne is an excellent choice, as its tube shape captures the sauce perfectly. Fettuccine, with its wide ribbons, also works well, giving each bite a hearty, satisfying texture. If you prefer something a bit more robust, rigatoni is another great option, as its ridges help to trap the creamy sauce. Choose any of these pasta types for a dish that delivers the right balance of flavors in every bite.
Making the Creamy Sauce The key to a delicious Philly Cheesesteak Pasta is a rich, creamy sauce that brings all the ingredients together. Start by making a base with heavy cream, which will give the sauce its smooth and velvety texture. For added depth and flavor, melt in your choice of cheese, such as provolone or American cheese, which creates a creamy, cheesy sauce that pairs perfectly with the steak. You can also mix in a bit of Parmesan for a salty, umami kick. To ensure the sauce is thick and coats the pasta well, allow it to simmer and thicken slightly before adding the cooked pasta.
Sautéing Steak and Vegetables For that authentic Philly cheesesteak flavor, sauté the steak and vegetables to bring out their natural savory goodness. Start by thinly slicing your steak against the grain, which helps it cook quickly and remain tender. In a hot skillet, sear the steak until it’s browned and cooked to your desired level of doneness. Remove the steak and set it aside. In the same skillet, sauté onions and bell peppers until they’re softened and slightly caramelized—this step adds that signature Philly cheesesteak flavor. Once the vegetables are cooked, combine them with the steak and pasta, then toss everything in the creamy sauce for a satisfying and flavorful dish.
Philly Cheesesteak Pasta Variations to Try
Adding Mushrooms and Garlic For an added layer of flavor, consider incorporating mushrooms and garlic into your Philly Cheesesteak Pasta. Mushrooms bring an earthy, umami richness that complements the savory steak and creamy cheese sauce. Sautéed alongside the onions and peppers, they add depth and complexity to the dish. Garlic, whether minced or roasted, also enhances the overall flavor profile with its aromatic punch, creating a more robust and savory pasta that elevates the traditional Philly cheesesteak taste.
Spicy Version If you like a bit of heat, a spicy version of Philly Cheesesteak Pasta will take this dish to the next level. Try adding sliced jalapeños or red pepper flakes to the sautéed vegetables for a gentle kick. For an even spicier option, drizzle in some hot sauce or incorporate spicy cheese, like pepper jack, into the sauce. This variation balances the rich creaminess with a fiery kick, perfect for those who enjoy bold, spicy flavors in their comfort food.
Casserole Style Transform your Philly Cheesesteak Pasta into a hearty casserole for a filling and satisfying meal. After combining the pasta, steak, vegetables, and creamy sauce, pour everything into a baking dish and top with extra cheese. Bake until the top is golden and bubbly, creating a cheesy crust that adds a delightful texture to each bite. This casserole version is perfect for family dinners or when you want to prepare a dish in advance for easy reheating. The crispy, cheesy top combined with the creamy interior makes this variation a true crowd-pleaser.
Tips for Making the Best Philly Cheesesteak Pasta
Use High-Quality Steak The key to a truly flavorful Philly Cheesesteak Pasta is the quality of the steak. For the best results, opt for cuts like ribeye or flank steak. Ribeye offers a tender, juicy texture with a good amount of marbling, making it ideal for a rich, flavorful dish. Flank steak, though leaner, also works well if sliced thinly against the grain to maintain tenderness. Whatever cut you choose, be sure to slice the steak thinly to ensure it cooks quickly and evenly, providing that melt-in-your-mouth experience that’s essential to this dish.
Perfecting the Cheese The creamy cheese sauce is one of the highlights of Philly Cheesesteak Pasta, so it’s crucial to melt the cheese properly. Start by using a combination of cheeses for both flavor and smoothness—American cheese and provolone are great options. To melt the cheese without it becoming gritty or separating, add it slowly to the warm cream sauce, stirring constantly. If you’re using a block of cheese, grate it first to help it melt more evenly. For a richer sauce, you can also mix in some cream cheese or a dollop of sour cream for extra creaminess.
Balance the Flavors Balancing the rich creaminess of the sauce with the savory flavors of the steak and vegetables is essential to making the perfect Philly Cheesesteak Pasta. The cheese and cream will provide a rich, indulgent base, but you’ll want to ensure that the savory steak and sautéed onions and peppers stand out. Add a pinch of salt and freshly ground pepper to taste, and consider a dash of garlic powder or onion powder to enhance the savory notes. To cut through the richness, a squeeze of lemon juice or a splash of white wine can add a subtle brightness, balancing the dish and keeping it from feeling too heavy.
Why Philly Cheesesteak Pasta Is Perfect for Any Occasion
Weeknight Dinner Philly Cheesesteak Pasta is the ideal solution for busy weeknights when you need a hearty, satisfying meal in a hurry. This dish comes together quickly—within 30 minutes—making it perfect for those days when you don’t have a lot of time to spend in the kitchen. With simple ingredients like steak, pasta, and cheese, you can whip up a flavorful, comforting dinner without any complicated steps or long prep times. It’s the kind of meal that delivers big flavors with minimal effort, ensuring your family gets a delicious meal even on the busiest evenings.
Comfort Food for Family Gatherings This dish is the ultimate comfort food, making it a hit for family meals or casual get-togethers. The creamy, cheesy sauce, tender steak, and hearty pasta make for a crowd-pleasing combination that everyone can enjoy. Whether you’re hosting a family dinner or a relaxed weekend gathering, Philly Cheesesteak Pasta is a dish that satisfies both kids and adults alike. It’s filling, flavorful, and sure to bring smiles to the table, making it the perfect choice for any family-friendly meal.
Impress Your Guests Looking to impress your guests at your next dinner party or casual gathering? Philly Cheesesteak Pasta is a showstopper that combines classic flavors with a unique twist. It’s a dish that’s both familiar and exciting, offering something new while still staying true to the flavors everyone loves. Whether you’re serving it for a special occasion or a laid-back get-together, this dish will have your guests raving about your cooking skills. With its rich, creamy sauce and savory steak, Philly Cheesesteak Pasta looks impressive and tastes even better, making it a perfect choice for entertaining.
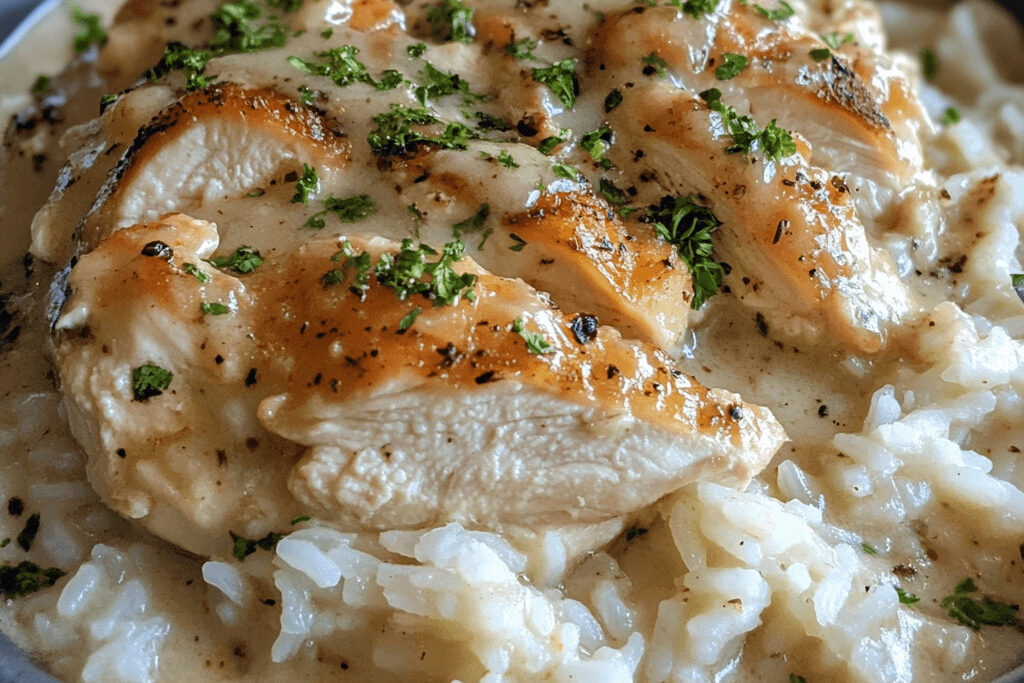
Definition of Smothered Chicken: Smothered chicken refers to a cooking technique where the chicken is browned and then slowly cooked in a rich, flavorful gravy. The chicken is “smothered” in the gravy, allowing the meat to become tender and infused with the savory sauce. This method of cooking ensures the chicken stays moist and flavorful, with the gravy adding an extra layer of richness.
Why it’s a Comfort Food: Smothered chicken and rice is the epitome of comfort food. The combination of tender chicken, creamy gravy, and soft rice creates a hearty, satisfying meal that brings warmth and nostalgia to the table. It’s a dish that feels like home, often evoking memories of family gatherings or quiet, cozy dinners. The soul-soothing nature of this dish is especially beloved in Southern cuisine, where comfort food is an integral part of the culture.
History of Smothered Chicken and Rice: Smothered chicken and rice has deep roots in Southern cooking, with influences from African American culinary traditions. The smothering technique, which involves cooking meat in its own juices and a flavorful gravy, can be traced back to the need to tenderize tougher cuts of meat. Over time, the dish evolved, with rice serving as the perfect base to absorb the rich gravy. It became a staple in many Southern households, cherished for its simplicity and ability to feed a crowd. Today, it remains a beloved classic, with countless variations found across the South and beyond.
Ingredients for a Perfect Smothered Chicken and Rice
Chicken Cuts to Use: When making smothered chicken and rice, the choice of chicken cut can significantly impact the flavor and texture of the dish. Chicken breasts are leaner and cook faster, but they can sometimes become dry if overcooked. On the other hand, chicken thighs are juicier, more flavorful, and more forgiving during cooking. The extra fat in chicken thighs results in a tender and moist chicken, making them the preferred choice for many people. Ultimately, both cuts work well, so your choice depends on personal preference for texture and flavor.
Rice Options: The type of rice you use plays a big role in achieving the perfect texture for your dish. White rice is the most common choice, offering a light, fluffy texture that soaks up the gravy beautifully. For a heartier option, brown rice is a great choice; its nutty flavor and slightly chewy texture add depth to the dish. Long-grain rice, such as jasmine or basmati, is also a popular option because it remains separate and fluffy when cooked, providing a nice contrast to the smothered chicken and rich gravy.
Key Seasonings and Ingredients: To bring out the deep flavors in smothered chicken and rice, you’ll need a few essential seasonings and ingredients. Onions and garlic are the backbone of the dish, providing a savory base. Bell peppers (often used in Southern versions) add color and a mild sweetness. A good broth—whether chicken or vegetable—is essential for making a flavorful gravy that will envelop the chicken and rice. Don’t forget about gravy itself, which is the key component for “smothering” the chicken and creating a rich, comforting sauce.
Other Optional Ingredients: While the basic ingredients create a delicious smothered chicken and rice dish, you can elevate it by adding other vegetables or herbs. Consider adding mushrooms for an earthy flavor, carrots for a touch of sweetness, or peas for a burst of color and texture. Fresh herbs such as thyme or parsley can also brighten up the dish and complement the savory gravy. Experimenting with these optional ingredients allows you to customize the dish to your taste, while still maintaining the comforting essence of the classic recipe.
How to Make Smothered Chicken and Rice (Step-by-Step)
Step 1: Prepare the Chicken – Seasoning and Browning the Chicken for Maximum Flavor Start by seasoning the chicken with your favorite spices. A simple mix of salt, pepper, garlic powder, and paprika works wonderfully, but feel free to get creative with additional seasonings like onion powder, thyme, or cayenne pepper for a kick. Once seasoned, heat a bit of oil or butter in a large skillet over medium-high heat. Add the chicken (either breasts or thighs) and brown on both sides, about 3-4 minutes per side. This step locks in the flavor and creates a beautiful golden crust on the chicken, which will add richness to the dish later. Once browned, remove the chicken from the skillet and set it aside.
Step 2: Cooking the Rice – How to Make the Rice While Preparing the Chicken While the chicken is browning, begin cooking the rice. In a separate pot, bring water or broth to a boil, following the cooking instructions for the type of rice you’re using. For white rice, typically use a 2:1 ratio of water to rice. For brown rice, use a 2.5:1 ratio. Add a pinch of salt to the water for extra flavor. Once boiling, reduce the heat, cover, and simmer until the rice is tender and the liquid has been absorbed. Set the rice aside once it’s done, and be sure to fluff it with a fork to avoid clumping.
Step 3: Making the Gravy – The Key to a Rich, Flavorful Gravy to “Smother” the Chicken To create the gravy, start by using the drippings left in the skillet from browning the chicken. If there’s excess fat, drain a little off, but leave enough to sauté onions, garlic, and bell peppers until softened and fragrant. Next, sprinkle in a bit of flour to create a roux, cooking for a minute or two until it turns golden brown. Gradually add chicken broth (or vegetable broth) while stirring to avoid lumps. Continue to cook and stir until the gravy thickens to your desired consistency. You can also add a bit of cream for a richer, smoother texture if you prefer.
Step 4: Combining Chicken, Rice, and Gravy – Bringing Everything Together for a Perfect Meal Now it’s time to bring everything together. In the same skillet with the gravy, return the browned chicken to the pan. Spoon the gravy over the chicken and cover, letting it simmer on low for about 15-20 minutes, allowing the chicken to absorb the flavors. Meanwhile, plate the cooked rice and top with the smothered chicken. Generously spoon the gravy over the chicken and rice for a comforting, savory meal. Garnish with freshly chopped parsley or green onions for added color and flavor. Your smothered chicken and rice is now ready to serve, a true comforting meal perfect for any occasion!
Tips for a Quick and Easy Smothered Chicken and Rice
Use One-Pot Cooking – Save Time and Cleanup with This Simple Method One of the easiest ways to streamline your smothered chicken and rice recipe is by using a one-pot cooking method. This allows you to cook the chicken, rice, and gravy all in the same skillet or Dutch oven, reducing the number of dishes to wash later. After browning the chicken, you can cook the rice directly in the same pot by adding broth and letting it simmer with the chicken. This method not only saves time but also helps the flavors meld together beautifully, giving you a dish that’s both easy to prepare and full of rich, comforting flavors.
Make It a Casserole – How to Turn This Into an Easy Chicken and Rice Casserole Transform your smothered chicken and rice into a casserole for a simple, make-ahead dinner option. After browning the chicken and cooking the rice, combine them with your gravy and vegetables in a large casserole dish. Top the mixture with shredded cheese, breadcrumbs, or even crispy fried onions, then bake in the oven until the top is golden and bubbly. This not only makes for a more hands-off meal but also gives you the convenience of having a complete, comforting dish ready to serve at any time.
Prep Ahead – How to Prep Ingredients in Advance for a Faster Cooking Time To make the cooking process even quicker, try prepping your ingredients in advance. Chop your vegetables, season the chicken, and even cook the rice the day before. Store these items in separate containers in the refrigerator, and when you’re ready to cook, simply assemble everything in the pan. This will drastically reduce your cooking time on the day you plan to serve the dish, making it a great option for busy weeknights.
Use Shortcuts – Store-Bought Gravy or Broth to Save Time Without Sacrificing Flavor If you’re short on time, there’s no shame in taking a few shortcuts. Store-bought gravy or broth can help speed up the process without compromising flavor. Choose a high-quality brand to ensure that your dish still tastes rich and savory. Pre-made gravy can be added directly to the pan, and pre-made broth can serve as the base for your gravy. These simple time-savers allow you to enjoy the delicious flavors of smothered chicken and rice without the extra effort.
Variations of Smothered Chicken and Rice
Adding Vegetables – Bell Peppers, Peas, or Carrots for a Healthier Twist For a healthier and more vibrant version of smothered chicken and rice, consider adding vegetables to the dish. Bell peppers, with their mild sweetness and bright color, are a great addition to the gravy. Carrots provide a slight crunch and natural sweetness, while peas add a pop of color and a boost of nutrients. You can sauté these vegetables along with the onions and garlic for a flavorful base or stir them into the gravy to simmer until tender. Not only will this increase the nutritional value, but it will also add texture and a well-rounded flavor profile to your dish.
Spicy Version – Adding Hot Sauce or Chili Flakes for a Bit of Heat If you love a little heat, try spicing up your smothered chicken and rice by adding hot sauce or chili flakes. A few dashes of hot sauce in the gravy or a pinch of red chili flakes can bring an exciting kick to the dish. For extra depth, try using a jalapeño or serrano pepper when sautéing your vegetables, or mix in a bit of cayenne pepper to the seasoning for the chicken. The heat complements the richness of the gravy and adds a bold, zesty element to the meal.
Different Types of Rice – Try Jasmine Rice or Wild Rice for a Different Texture and Flavor While traditional white rice is commonly used, switching up the rice can bring a unique twist to your smothered chicken and rice. Jasmine rice, with its fragrant, slightly floral aroma, pairs wonderfully with the savory gravy. Alternatively, wild rice offers a nutty flavor and chewy texture that adds complexity to the dish. Brown rice is another healthy option, providing a heartier, more fibrous base. Experimenting with different types of rice can elevate the dish, making it more exciting and flavorful.
Making It a Complete Meal – How to Balance the Dish with a Side Salad or Steamed Vegetables To make your smothered chicken and rice even more satisfying, serve it as part of a complete meal. A light side salad with fresh greens, such as spinach, arugula, or mixed greens, can add a crisp contrast to the rich and creamy chicken and rice. You can also pair the dish with steamed vegetables like broccoli, green beans, or asparagus to add fiber and extra nutrients. These sides help balance the richness of the main dish while keeping the meal fresh and well-rounded.
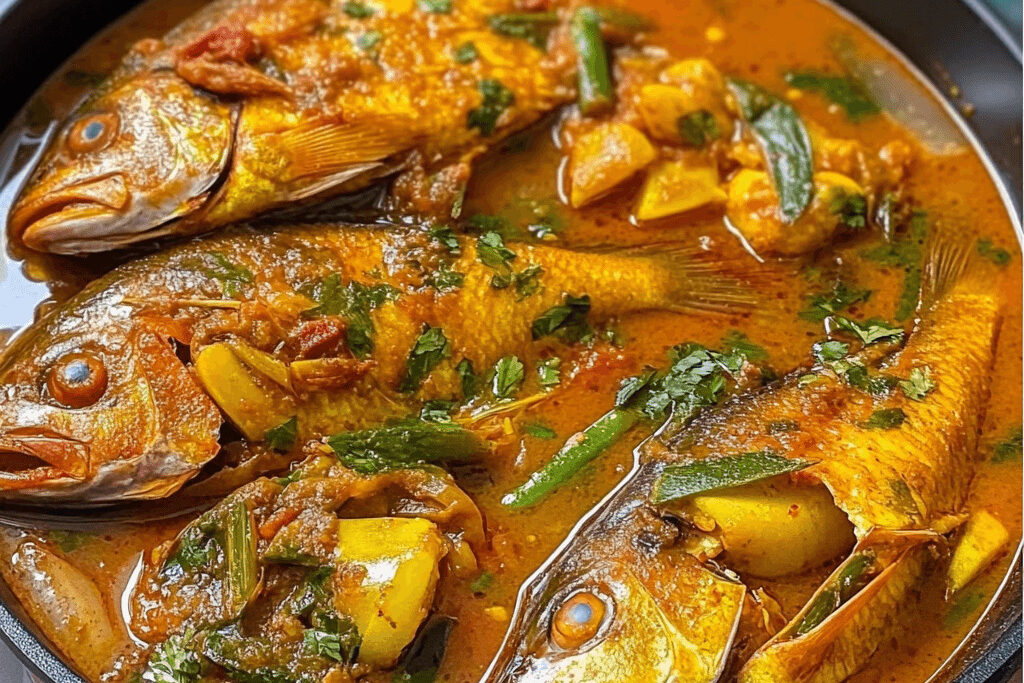
Fish curry is a rich, flavorful dish that has captured the hearts of food lovers across the globe. From the bustling streets of India to the serene coastlines of Southeast Asia, this versatile recipe has become a staple in many cuisines. Its unique combination of aromatic spices, tender fish, and creamy sauces makes it a comforting meal enjoyed by many. Whether you prefer it mild or spicy, with a coconut-based sauce or a tangy tomato base, fish curry can be easily adapted to suit different tastes.
The beauty of fish curry lies in its simplicity and the variety of ingredients used. Commonly made with fresh fish like salmon, tilapia, or mackerel, the dish is often seasoned with a blend of spices such as turmeric, cumin, ginger, and garlic. Add a splash of coconut milk or yogurt to create a rich, velvety texture, and you have a dish that’s both nutritious and bursting with flavor. Fish curry is not just a meal; it’s a celebration of the diverse flavors that come together to create a dish loved across cultures.
What Makes a Perfect Fish Curry?
A perfect fish curry is a harmonious blend of spices, fresh ingredients, and a rich, creamy sauce. Each element plays a crucial role in creating a dish that’s flavorful, comforting, and satisfying. Let’s explore the key factors that make a fish curry truly exceptional.
Perfect Balance of Spices
The foundation of any great fish curry lies in the spices. A well-balanced mix of turmeric, cumin, coriander, and chili is essential for developing the curry’s complex flavor profile. Turmeric adds a warm, earthy undertone, while cumin and coriander bring a hint of nuttiness and citrusy freshness. Chili, whether fresh or dried, provides the right amount of heat, which can be adjusted to suit personal preferences. The combination of these spices enhances the natural flavor of the fish, creating a perfectly seasoned dish.
Freshness of Fish
The quality of the fish you use can make all the difference in your curry. Fresh, high-quality fish ensures a tender and succulent texture that complements the spices and sauce. Common fish varieties used in curry include salmon, tilapia, and mackerel. Salmon, with its rich, fatty texture, is perfect for absorbing the curry’s flavors. Tilapia, on the other hand, offers a mild taste that pairs well with a variety of spices. Mackerel, known for its strong flavor, works wonderfully in spicier curry recipes. Choosing the right fish is crucial for achieving the best results.
Rich and Flavorful Sauce
A creamy, flavorful sauce is what ties the dish together and elevates the fish curry to perfection. Coconut milk is a popular choice, offering a silky texture and a slight sweetness that balances the heat from the spices. It also complements the fish, providing a rich, smooth base. For a tangier twist, yogurt can be used in place of coconut milk, giving the curry a slightly sour edge while maintaining a creamy consistency. The sauce serves as the perfect vehicle for the fish, allowing the spices and seasonings to infuse every bite with incredible flavor.
Essential Ingredients for Fish Curry
To make the perfect fish curry, selecting the right ingredients is key. From choosing the freshest fish to picking the right spices, each component adds its own unique flavor and texture to the dish. Here’s a breakdown of the essential ingredients for a truly memorable fish curry.
Fish Selection
The fish you choose plays a crucial role in the overall taste and texture of the curry. Ideally, you’ll want fish that is firm enough to hold up to cooking but also absorbs the curry’s rich flavors. Some of the best fish for curry include:
Cod: With its mild flavor and flaky texture, cod is an excellent choice for a subtle, tender curry.
Mackerel: Known for its rich, oily texture, mackerel is perfect for a spicier curry, as it stands up well to bold flavors.
Bass: This fish has a firm, slightly sweet flavor that complements both mild and spicy curry preparations.
Other fish like tilapia, snapper, and haddock are also popular choices for making curry, depending on the desired flavor and texture.
Spices and Seasonings
The spices you use are what give your fish curry its signature aroma and depth of flavor. These essential spices are commonly found in most fish curry recipes:
Curry Leaves: These fragrant leaves are a must in many Indian-style fish curries, imparting a unique, slightly citrusy flavor.
Mustard Seeds: Used in tempering, mustard seeds add a subtle heat and nuttiness to the curry.
Ginger and Garlic: Fresh ginger and garlic provide a sharp, aromatic foundation for the curry, elevating the flavor and enhancing the overall fragrance.
Turmeric: Known for its vibrant yellow color and earthy flavor, turmeric is essential in giving fish curry its distinctive hue and depth.
Cumin and Coriander: These spices are commonly used in curry blends and contribute warmth, citrusy tones, and a bit of sweetness.
The perfect combination of these spices will create a flavorful and aromatic base for your curry.
Vegetables and Add-ons
While fish is the star of the dish, adding a few vegetables and extra ingredients can elevate the flavor and texture of your fish curry:
Tomatoes: Fresh tomatoes provide a tangy base that balances the richness of the fish and the curry sauce.
Potatoes: Adding potatoes makes the curry heartier and helps absorb the spices, creating a more filling dish.
Spinach: Fresh spinach can be stirred in towards the end, adding a boost of color, texture, and nutrition to your curry.
Chilies: For those who enjoy heat, fresh or dried chilies can be added to kick up the spice level.
These vegetables not only enhance the curry’s flavor but also add nutritional value, making your fish curry a well-rounded, satisfying meal.
Step-by-Step Guide to Making Fish Curry
Making a delicious fish curry involves several simple yet essential steps. From prepping the fish to creating a flavorful curry base, and finally simmering the ingredients to perfection, this step-by-step guide will walk you through the process of creating a mouth-watering fish curry.
Preparation of Fish
Before you start cooking, proper preparation of the fish is key to ensuring it absorbs the flavors and cooks evenly.
Cleaning the Fish: Rinse the fish under cold water to remove any scales, blood, or impurities. If you’re using whole fish, gut and remove the bones. For fillets, ensure they are deboned and skinless.
Cutting the Fish: Cut the fish into chunks or pieces that are large enough to hold together during cooking but small enough to absorb the curry’s flavors. About 2-3 inch pieces are ideal.
Marinating the Fish: Marinate the fish with a pinch of salt, turmeric, and a squeeze of lemon or lime juice. This step helps the fish retain moisture and enhances its flavor. Let it marinate for about 15-20 minutes before cooking.
Making the Curry Base
The curry base is the heart of any good fish curry, and this is where all the rich flavors begin to develop.
Sautéing Onions: Heat oil in a large pan and sauté finely chopped onions until golden brown. This creates a sweet, aromatic foundation for your curry.
Adding Garlic and Ginger: Once the onions are browned, add minced garlic and ginger. Stir well to release their aromatic oils and cook for another 2 minutes until fragrant.
Adding Spices: Now, add your ground spices — turmeric, cumin, coriander, and chili powder — to the onion, garlic, and ginger mixture. Stir continuously to prevent the spices from burning and allow them to toast, releasing their full flavor.
Tomatoes (optional): If you’re using tomatoes, add them now and cook until they break down and soften, creating a thick, rich paste that forms the curry base.
Cooking the Fish
Now that the curry base is ready, it’s time to add the fish and cook it to perfection.
Adding the Fish: Gently add the marinated fish pieces to the curry base. Be careful not to break the fish. Spoon some of the curry mixture over the fish to coat it evenly.
Simmering the Fish: Cover the pan and simmer the curry on low heat for 10-15 minutes, depending on the size of the fish pieces. Fish cooks quickly, so check regularly to ensure it doesn’t overcook. The fish should become tender and flaky, absorbing all the wonderful flavors of the curry.
Final Touches
The final touches are where you can perfect the flavor and texture of your curry.
Adjusting the Seasoning: Taste your curry and adjust the seasoning with salt, pepper, or additional spices. You can also add a bit of sugar or honey if the curry needs a hint of sweetness to balance the heat.
Adding Coconut Milk or Yogurt: If you’re using coconut milk, add it now to create a creamy texture and smooth flavor. Stir gently to incorporate. If you prefer yogurt, add it towards the end, ensuring it’s well-mixed without curdling.
Garnishing: For the final touch, garnish your fish curry with fresh coriander, a squeeze of lemon or lime, and a few fresh curry leaves. This adds freshness and a vibrant pop of color to your dish.
Once your curry is ready, serve it hot with steamed rice, naan, or a side of vegetables to complete the meal.
Tips for the Best Fish Curry
Creating the perfect fish curry is not only about following the recipe — it’s also about making smart choices and adjustments to suit your tastes. Here are some essential tips to ensure your fish curry turns out rich, flavorful, and just the right level of deliciousness.
Choosing the Right Fish for Your Curry
The type and quality of fish you choose will greatly influence the texture and flavor of your curry.
Freshness is Key: Always opt for the freshest fish you can find. Fresh fish has a clean, firm texture and absorbs the curry’s flavors better than frozen or older fish. If you’re using frozen fish, make sure to thaw it properly before cooking.
Sustainability: Choose sustainably sourced fish to support environmental practices. Look for eco-labels like MSC (Marine Stewardship Council) or check local fisheries that focus on sustainable fishing. Common sustainable choices for curry include cod, tilapia, and mackerel.
Firmness: Choose fish that holds up well during cooking. Fish like mackerel, salmon, and bass are excellent for curries because they stay intact, even when simmered for long periods. Avoid delicate fish like sole or flounder, as they may break apart in the curry.
Balancing the Heat
Fish curry can range from mildly spiced to very hot, depending on your preferences. Here’s how to balance the heat:
Adjust the Chili: If you like a milder curry, reduce the amount of chili or omit the fresh chilies. Instead, use a small amount of chili powder to control the heat level.
Use Chili in Moderation: Start with a small amount of chili and taste as you go. You can always add more, but it’s harder to reduce the heat once it’s in the dish.
Sweeteners for Balance: If the curry ends up too spicy, you can balance it with a small amount of sugar, honey, or coconut milk. This will tone down the heat while adding sweetness and depth to the curry.
Yogurt for Mildness: If the curry is too hot for your liking, stirring in a bit of plain yogurt can help cool it down and add creaminess without compromising flavor.
How to Thicken the Sauce
A rich, creamy sauce is what makes a fish curry so indulgent. Here are a few tips to ensure your curry has the perfect consistency:
Coconut Milk: Coconut milk is not only great for flavor but also helps create a thick, creamy base for the curry. For an even thicker sauce, use full-fat coconut milk instead of light coconut milk.
Simmering: Let the curry simmer on low heat for a longer time to reduce the sauce and intensify the flavors. This also helps thicken the liquid naturally.
Cornstarch or Flour: If you need to thicken the curry quickly, you can mix a small amount of cornstarch or all-purpose flour with water to form a slurry, then stir it into the curry. Let it cook for a few minutes to thicken.
Ground Nuts: Ground almonds or cashews are often used in some fish curry recipes to add thickness and richness. Simply blend a handful of nuts with some water and stir it into the curry.
Pureed Vegetables: Blending cooked vegetables like potatoes or tomatoes into the sauce can also help thicken the curry and add an extra layer of flavor.
With these tips, you can create a fish curry that’s perfectly tailored to your taste — whether you prefer it mild, spicy, or extra creamy!
Serving and Pairing Your Fish Curry
The way you serve and present your fish curry can elevate the entire dining experience. With the right side dishes, accompaniments, and a few simple garnishes, your fish curry can go from delicious to extraordinary. Here are some ideas to make your meal complete.
Best Side Dishes
Fish curry pairs beautifully with a variety of side dishes that help balance its bold flavors. Here are a few popular options:
Rice: Steamed basmati rice is the classic choice to serve with fish curry. Its light, fluffy texture complements the rich sauce and helps absorb the curry. You can also try coconut rice for a slightly sweet, aromatic variation that pairs wonderfully with coconut-based fish curries.
Naan: Soft, pillowy naan bread is perfect for scooping up the curry and sopping up the sauce. Garlic naan or butter naan adds an extra layer of flavor to the meal.
Flatbreads: If you prefer, other types of flatbread like chapati or roti can be used to complement the curry. Their slightly chewy texture works well with the rich, creamy sauce.
Accompaniments
Adding a few flavorful accompaniments alongside your fish curry can balance the richness and spice of the dish. Here are some great options:
Chutneys: A tangy mango or mint chutney provides a refreshing contrast to the heat and richness of the curry. The sweet and sour notes of the chutney will enhance the curry’s flavors.
Yogurt: A cooling side of plain yogurt or raita (yogurt mixed with cucumber, mint, and spices) is a great way to balance the heat in the curry while adding a creamy texture.
Pickles: Indian-style pickles, such as mango or lime pickle, are perfect for adding a sharp, tangy bite that contrasts with the curry’s flavors. A small serving goes a long way in enhancing the dish.
Presentation Tips
The presentation of your fish curry is the final touch that makes it look as good as it tastes. Here are a few simple garnishing ideas to make your dish visually appealing:
Fresh Coriander: A sprinkle of finely chopped fresh coriander (cilantro) adds a pop of color and a burst of fresh flavor. It’s the perfect garnish to brighten up the rich, golden curry.
Lemon or Lime Wedges: A squeeze of fresh lemon or lime right before serving adds a zesty kick and brings out the brightness in the curry. Place a few wedges on the side for guests to squeeze as desired.
Curry Leaves: If you have access to fresh curry leaves, scatter a few on top of the curry for an authentic touch and a subtle aromatic flavor.
Sliced Red Onions: Thinly sliced red onions, either raw or lightly pickled, can add a crunch and a bit of sharpness to contrast the creamy sauce.
By carefully selecting your side dishes, accompaniments, and garnishes, you can enhance the overall flavor profile and presentation of your fish curry, creating a truly satisfying and memorable meal.
Conclusion
Making the perfect fish curry is a simple yet rewarding process that combines fresh ingredients, aromatic spices, and a rich, flavorful sauce. By following the steps—preparing the fish, creating a flavorful curry base, carefully cooking the fish, and finishing with the right touches—you can craft a dish that’s sure to impress.
Remember, the key to a great fish curry lies in choosing the right fish, balancing the spices, and adjusting the heat to your taste. Whether you prefer a creamy coconut-based sauce or a tangy tomato base, the beauty of fish curry is its versatility. Don’t be afraid to experiment with different spices, fish varieties, or additional ingredients like vegetables and herbs to make the recipe your own.
So, why not give this recipe a try? With a little practice, you’ll be making the perfect fish curry in no time. Enjoy the process, and feel free to get creative with your own variations!
Craving a hearty, cheesy, and satisfying meal that’s easy to prepare? Look no further than these delicious Cheesy Beef Burritos with Fries. This recipe combines the rich, savory flavors of seasoned ground beef and gooey melted cheese wrapped in a warm tortilla, paired with crispy golden fries for the ultimate comfort food experience.
The combination of burritos and fries is a match made in culinary heaven. The burrito’s soft, cheesy goodness perfectly balances the crunch and saltiness of the fries, making it a crowd-pleasing meal for any occasion. Whether you’re feeding your family, hosting friends, or simply treating yourself, this meal checks all the boxes.
The best part? It’s incredibly simple to make at home with easy-to-find ingredients and minimal prep time. Let’s dive into the recipe and learn how to create this irresistible dish in your own kitchen!
Ingredients You’ll Need for Cheesy Beef Burritos with Fries
Before diving into the recipe, let’s gather all the ingredients you’ll need to make these irresistible Cheesy Beef Burritos with Fries. From the savory burrito filling to the crispy fries, everything comes together for a delicious and satisfying meal.
Main Ingredients for the Burritos
Ground Beef: The flavorful base for your burritos.
Cheddar Cheese: Adds a gooey, cheesy layer that melts perfectly.
Flour Tortillas: Soft and pliable, perfect for wrapping up all the goodness.
Seasonings: A mix of cumin, paprika, and chili powder to pack in the flavor.
Toppings and Fillings
Shredded Lettuce: Adds a fresh, crunchy texture.
Diced Tomatoes: Juicy and refreshing, perfect for balancing the richness.
Salsa or Hot Sauce: For an extra kick of spice and flavor.
Sour Cream: Creamy and tangy, a classic burrito topping.
For the Fries
Potatoes or Store-Bought Frozen Fries: The ideal crispy side to complement your burritos.
Optional Seasoning for Fries: Enhance the flavor with paprika or garlic powder for a little extra zing.
Now that you have your ingredients ready, let’s move on to preparing this mouthwatering meal!
Step-by-Step Guide to Making Cheesy Beef Burritos
Follow this simple guide to create the perfect Cheesy Beef Burritos that are bursting with flavor. From preparing the filling to assembling and cooking, every step is easy and guaranteed to deliver delicious results.
1. Preparing the Beef Filling
Cook the Ground Beef: Heat a skillet over medium heat, add ground beef, and cook until browned. Drain any excess fat.
Season the Beef: Stir in cumin, paprika, chili powder, and salt to taste. Mix well to ensure every bite is packed with flavor.
Optional Add-Ins: Add refried beans or diced vegetables like bell peppers or onions for extra texture and flavor.
2. Assembling the Burritos
Warm the Tortillas: Heat the tortillas in a dry skillet or microwave to make them pliable.
Layer the Ingredients: Start with a generous portion of the beef filling, followed by shredded cheddar cheese, and your favorite toppings like lettuce, diced tomatoes, and a drizzle of salsa or hot sauce.
Fold the Burrito: Tightly fold in the sides and roll up the tortilla to secure the filling.
3. Cooking the Burritos
Pan-Sear: Heat a skillet with a small amount of oil or butter and place the burritos seam-side down. Cook for 2-3 minutes per side until golden and crispy.
Bake Option: Alternatively, place the burritos on a baking sheet and bake in a preheated oven at 375°F (190°C) for about 10 minutes until the cheese melts and the tortillas are slightly crispy.
With your burritos ready, all that’s left is to plate them up alongside some crispy fries and enjoy!
Making Crispy Fries to Pair with Burritos
No burrito meal is complete without a side of perfectly crispy fries. Here’s how to prepare and cook fries that are golden, crunchy, and the perfect complement to your cheesy beef burritos.
1. Preparing the Potatoes
Cut Fresh Potatoes: Peel and slice fresh potatoes into thin, even strips for consistent cooking. Alternatively, opt for store-bought frozen fries for convenience.
Season the Fries: Toss the potatoes with salt and optional seasonings like paprika, garlic powder, or black pepper to enhance the flavor.
2. Cooking the Fries
Baking Method: Spread the fries on a baking sheet lined with parchment paper. Drizzle with oil and bake at 425°F (220°C) for 25-30 minutes, flipping halfway through for even crisping.
Air-Frying Method: Place the fries in an air fryer basket in a single layer. Cook at 375°F (190°C) for 15-20 minutes, shaking the basket occasionally.
Deep-Frying Method: Heat oil in a deep pan or fryer to 350°F (175°C). Fry the potatoes in small batches until golden brown, then drain on paper towels.
3. Tips for Achieving Restaurant-Style Fries
Soak the cut potatoes in cold water for 30 minutes to remove excess starch for crispier results.
Double-fry the potatoes: fry them once at a lower temperature to cook through, then a second time at a higher temperature to achieve crispiness.
4. Serving Suggestions
Dipping Sauces: Serve the fries with ketchup, cheese sauce, or spicy mayo for dipping.
Garnish: Sprinkle the fries with chopped parsley or grated Parmesan for a gourmet touch.
Pair these crispy fries with your cheesy beef burritos, and you’ve got the ultimate comfort food combo!
Tips and Variations for Perfect Cheesy Beef Burritos
Make your Cheesy Beef Burritos even better with these tips and variations. From customizing the filling to trying new cheese options and serving ideas, there’s something for everyone to enjoy.
1. Customizing Your Burritos
Protein Alternatives: Swap out ground beef for shredded chicken, ground turkey, or a plant-based meat substitute to suit your preferences.
Flavor Boosters: Add diced jalapeños for a spicy kick, or mix in sweet corn for a touch of sweetness and texture.
Vegetarian Option: Skip the meat and fill your burritos with black beans, refried beans, or sautéed veggies for a vegetarian twist.
2. Cheese Options
Mix It Up: Use a combination of cheeses like Monterey Jack, pepper jack, or mozzarella for a melty, flavorful experience.
Extra Indulgence: Drizzle your burritos with warm queso or nacho cheese sauce for an extra layer of creamy goodness.
3. Serving Ideas
Classic Pairings: Serve your burritos with guacamole, sour cream, or pico de gallo for a fresh, tangy balance.
Low-Carb Option: Enjoy your burritos open-faced by layering the fillings over a tortilla and skipping the wrap.
Family-Style: Set up a burrito bar with all the toppings and let everyone build their own customized burrito.
These tips and variations ensure you can personalize your cheesy beef burritos to match your cravings, making them perfect for any occasion!
Why You’ll Love This Recipe
There are countless reasons to love these Cheesy Beef Burritos with Fries, but here are the top highlights that make this recipe a winner for any occasion.
1. Perfect for Any Occasion
Whether you’re hosting a party, preparing a family dinner, or enjoying a cozy night in, this recipe is versatile enough to suit any setting.
The combination of hearty burritos and crispy fries is a guaranteed crowd-pleaser that everyone will enjoy.
2. Easy and Customizable
This recipe is simple to follow, making it ideal for beginners and seasoned cooks alike.
Adjust the ingredients to match your preferences—swap proteins, change up the toppings, or experiment with different cheeses to make it your own.
3. Budget-Friendly and Delicious
Made with affordable, everyday ingredients, this recipe is a cost-effective way to create a restaurant-quality meal at home.
Despite its simplicity, the bold flavors and satisfying textures ensure you don’t sacrifice taste for budget.
With its versatility, ease of preparation, and incredible flavor, this recipe is bound to become a go-to favorite in your kitchen!
Conclusion
These Cheesy Beef Burritos with Fries are the perfect combination of simplicity and flavor. With just a few easy steps, you can create a delicious meal that’s sure to satisfy everyone at the table. The savory beef, melted cheese, and crispy fries come together for a fun twist on a classic burrito that everyone will love.
Give this recipe a try, and let us know how it turns out! Don’t forget to share it with your friends and family or leave a comment below to tell us about your experience. Happy cooking!
Gender reveal cakes have become a delightful centerpiece of one of life’s most exciting moments—announcing whether you’re expecting a little boy or girl! These cakes are more than just a sweet treat; they add an element of surprise and joy to your celebration, making the big reveal even more memorable.
Creating a gender reveal cake at home allows you to personalize every detail, from the flavor to the decorations, ensuring it reflects your unique style and story. Whether you’re planning a small family gathering or a big reveal party, this guide will walk you through everything you need to know.
In this post, you’ll learn how to design the perfect gender reveal cake, gather the right ingredients and tools, bake a cake with a hidden surprise, and decorate it like a pro. Let’s get started on creating a cake that will leave your guests in awe and your memory book full of smiles!
Choosing the right design ensures your cake will be both eye-catching and memorable for your big moment.
Choosing the Perfect Gender Reveal Cake Design
When planning a gender reveal cake, the design is a key element that adds personality and excitement to the celebration. Whether you prefer a simple style or an elaborate creation, here are some popular options and ideas to help you create a show-stopping centerpiece for your reveal party.
Popular Cake Styles for Gender Reveals
Layered Cakes
Create multiple layers of cake with a surprise color (pink or blue) revealed when sliced.
Experiment with different flavors like vanilla, chocolate, or even funfetti for added fun.
Drip Cakes
Add a colored ganache drip (pink or blue) to the edges for a modern, chic look.
Decorate with edible glitter, sprinkles, or macarons to enhance the design.
Fondant Designs
Use fondant for a smooth and professional finish.
Add themed decorations like baby items, bows, or even stenciled patterns for extra flair.
Incorporating Party Themes into the Cake
Rustic or Boho Vibes
Use neutral tones with hints of greenery and floral accents.
Opt for a semi-naked cake with subtle pink or blue details.
Modern and Minimalistic Styles
Stick with clean lines, monochromatic colors, and a simple yet elegant topper.
Perfect for those who prefer understated elegance.
Seasonal Themes
Tailor the cake to the season, like snowflakes for winter or pastel florals for spring.
Add seasonal elements, such as pumpkins, leaves, or snowmen, to tie it all together.
Sprinkles or Candy Fillings
Surprise Elements to Add Inside the Cake
Hollow out the center and fill it with pink or blue sprinkles or candies for a fun surprise when the cake is cut.
Color-Changing Cake Layers
Bake color-changing cake layers with a gradient effect that transitions from neutral to pink or blue.
Hidden Gender Messages
Hide a message inside the cake using edible letters or symbols that spell out “It’s a Boy!” or “It’s a Girl!”
Ingredients and Tools You’ll Need
Before you start creating your gender reveal cake, it’s essential to gather all the necessary ingredients and tools. Having everything prepared will make the baking and decorating process smooth and enjoyable. Here’s a comprehensive list of what you’ll need:
Essential Ingredients for the Cake
Basic Cake Ingredients
Cake flour, sugar, eggs, butter, and baking powder or soda.
Vanilla or other flavor extracts for added taste.
Food Coloring
High-quality pink and blue food coloring for the reveal layer or frosting.
Gel-based food coloring works best for vibrant colors without affecting the batter’s consistency.
Baking Tools and Equipment
Must-Have Tools
Piping bags for decorating with precision.
Cake pans in the desired shape and size for your cake design.
A sturdy spatula for spreading frosting evenly.
Helpful Additions
A cake leveler to ensure even layers for a professional look.
An offset spatula for smooth frosting application.
Optional Decorations for a Stunning Finish
Edible Decorations
Fondant for creating smooth surfaces and intricate designs.
Edible glitter or metallic accents for a touch of glamour.
Themed Decorations
Baby-themed cake toppers, such as baby shoes, pacifiers, or tiny bows.
Gender reveal-specific toppers, like question marks or “Boy or Girl” signs.
Step-by-Step Guide to Baking the Cake
Baking a gender reveal cake can be an exciting and creative process. Follow this step-by-step guide to ensure your cake is baked to perfection and ready for the big reveal.
Preparing the Cake Batter
Choosing Your Cake Flavor
Decide on a flavor that suits your taste and theme. Popular options include classic vanilla, rich chocolate, or unique choices like lemon or red velvet.
Ensure your flavor complements any frosting or decorations you plan to use.
Adding Food Coloring for the Reveal Layer
Divide your batter into two portions if you’re making a layered cake and add pink or blue food coloring to one portion.
Use gel-based food coloring for vibrant shades without altering the batter’s consistency.
Baking and Cooling Tips
How to Bake Evenly Without Overcooking
Preheat your oven and use the recommended temperature for your recipe.
Rotate the cake pans halfway through baking to ensure even cooking.
Use a toothpick to test for doneness; it should come out clean when the cake is fully baked.
Properly Cooling the Cake Before Decorating
Allow the cakes to cool in the pans for about 10-15 minutes after removing them from the oven.
Transfer the cakes to a wire rack and let them cool completely before adding frosting or filling.
Creating the Surprise Center
How to Hollow the Cake and Fill It with Sprinkles or Candy
Use a round cookie cutter or a knife to carefully hollow out the center of one cake layer, leaving a 1-inch border around the edges.
Fill the hollowed section with pink or blue sprinkles, candies, or even colored frosting.
Tips for Ensuring the Surprise Stays Hidden
Place the second cake layer on top to seal the surprise.
Smooth the frosting over the top and sides to hide any gaps or hints of the color inside.
Decorating Your Gender Reveal Cake
Basic Frosting Techniques for Beginners
Crumb Coating: Apply a thin layer of frosting over the cake to seal in any crumbs. This helps create a smooth surface for the final layer.
Smoothing the Final Layer: Once the crumb coat is set, spread a thicker layer of frosting and use a spatula or bench scraper to smooth the surface for a polished finish.
Advanced Decorations for a Wow Factor
Creating a Drip Effect with Ganache: Drizzle melted ganache over the edges of your cake for a stunning drip effect that adds sophistication and flair.
Adding Fondant Accents or Edible Flowers: Use fondant to create unique shapes or add edible flowers for an elegant, personalized touch.
Tips for Writing or Drawing on the Cake
Using Edible Pens or Piping Bags for Messages: You can write fun messages using edible pens or a piping bag with royal icing or frosting.
Ideas for Cute Messages Like “Boy or Girl?”: Personalize the cake with messages like “Boy or Girl?” or “Team Pink” vs. “Team Blue” to engage your guests in the reveal.
Tips for Hosting a Memorable Gender Reveal Party
Coordinating the Cake with Party Décor
Matching the Cake Colors to the Party Theme: Choose cake colors that complement your overall party theme, whether it’s soft pastels for a gender-neutral vibe or bold pink and blue for a more traditional reveal.
Timing the Cake Reveal
Creative Ideas for Cutting or Opening the Cake in Front of Guests: Create a moment of excitement by having the parents-to-be cut the cake to reveal the color inside, or use a hidden compartment that can be opened for a surprise.
Alternatives to Cake for Gender Reveals
Cupcakes, Cookies, or Cake Pops with Colored Centers: If you prefer smaller treats, cupcakes, cookies, or cake pops filled with colored centers are a fun and interactive alternative to the traditional cake.
Conclusion
Creating a gender reveal cake is a fun and creative way to celebrate such a special moment. By following these key steps—mastering basic frosting techniques, adding advanced decorations for that wow factor, and even considering alternatives to cake—you can make your reveal both delicious and memorable. Whether you’re cutting into a perfectly frosted cake or unveiling cupcakes filled with a surprise color, the options are endless. So, why not give it a try and add your personal touch to the celebration?
Have you tried making a gender reveal cake? Share your creations in the comments below!
If you’re looking to impress your guests with a dish that’s both elegant and unexpected, this Crab Brulee Recipe is the perfect choice. A savory twist on the classic crème brûlée, this dish combines the delicate sweetness of fresh crab meat with a rich, creamy custard and a beautifully caramelized topping. It’s a luxurious appetizer or light main course that will elevate any dinner party or special occasion.
What makes crab brulee so unique is its ability to blend gourmet flavors with a comforting, homemade touch. Despite its sophisticated appearance, it’s surprisingly simple to prepare in your own kitchen. Whether you’re a seafood enthusiast or a culinary adventurer, this recipe is sure to delight your taste buds and wow your guests.
In this blog post, we’ll walk you through everything you need to know to make the perfect crab brulee at home. From selecting the freshest ingredients to mastering that golden, crackly topping, you’ll soon have a restaurant-quality dish to add to your repertoire. Let’s dive in!
What Is Crab Brulee?
Crab brulee is a delightful savory twist on the classic dessert crème brûlée. While traditional crème brûlée is known for its sweet custard base and caramelized sugar topping, crab brulee takes a creative turn by incorporating rich, creamy custard with the delicate, slightly sweet flavor of fresh crab meat.
This dish has its roots in fine dining, where chefs often experiment with blending sweet and savory elements to create unique culinary experiences. The contrast of the silky custard with the crunchy, caramelized topping makes crab brulee a standout dish, perfect for seafood lovers seeking something luxurious and innovative.
Crab brulee is not just a feast for the taste buds; it’s also a visually stunning dish that can elevate any meal, whether it’s served as an appetizer, a light entrée, or the star of a dinner party. Its combination of elegance and comfort makes it an irresistible choice for special occasions.
Ingredients You’ll Need
Creating the perfect crab brulee begins with the right ingredients. Each component plays a vital role in achieving the creamy texture and delicate flavor that make this dish so special. Here’s what you’ll need:
Fresh Crab Meat
The star of this recipe is fresh crab meat. Opt for high-quality, lump crab meat for the best flavor and texture. Fresh crab adds a natural sweetness that pairs beautifully with the creamy custard. If fresh crab isn’t available, pasteurized crab meat is a good alternative, but avoid imitation crab as it lacks the delicate flavor of real crab.
Essential Ingredients
Heavy Cream: Provides the rich, velvety base for the custard.
Egg Yolks: The key to creating a smooth and luscious custard texture.
Parmesan Cheese: Adds a savory depth and a slightly nutty flavor.
Breadcrumbs: For an optional crisp topping that complements the caramelized crust.
Optional Add-Ins
To customize your crab brulee, consider adding:
Chives or Parsley: Fresh herbs for a pop of color and brightness.
Cayenne Pepper or Paprika: A touch of spice for added complexity.
Lemon Zest: A hint of citrus to enhance the crab’s natural sweetness.
Tips for Substitutions
If fresh crab is unavailable, you can substitute with other seafood like lobster or shrimp for a similar luxurious feel.
For a lighter version, swap out heavy cream for half-and-half, but note that the custard may be slightly less rich.
Experiment with different cheeses like Gruyère or Asiago for a unique flavor profile.
By choosing high-quality ingredients and incorporating your own twists, you’ll create a crab brulee that’s both decadent and memorable.
Step-by-Step Guide to Making Crab Brulee
Making crab brulee may sound sophisticated, but it’s surprisingly simple with the right approach. Follow these easy steps to create a creamy, savory masterpiece with a perfect caramelized crust.
1. Prepare the Custard Base
Start by whisking together the egg yolks and heavy cream until the mixture is smooth and well combined. Add seasonings like salt, pepper, and a touch of cayenne or paprika for a hint of spice. This base will provide the rich, velvety texture that makes crab brulee so irresistible.
2. Incorporate the Crab
Gently fold the fresh crab meat into the custard mixture. Be careful not to overmix or break up the delicate pieces of crab. This step ensures that each bite is filled with the sweet and savory flavor of high-quality crab.
3. Fill the Ramekins
Divide the custard mixture evenly among your ramekins, filling each about three-quarters full. This ensures even cooking and prevents overflow during baking. If desired, sprinkle a light layer of Parmesan cheese or breadcrumbs on top for added texture.
4. Bake to Perfection
Place the ramekins in a baking dish and fill the dish with hot water until it reaches halfway up the sides of the ramekins. This water bath helps the custard cook evenly and prevents it from curdling. Bake in a preheated oven at 325°F (160°C) for 30–40 minutes, or until the custard is set but still slightly jiggly in the center.
Once baked, allow the ramekins to cool slightly before caramelizing the topping. With this step-by-step guide, you’ll create a crab brulee that’s creamy, flavorful, and sure to impress!
Tips for the Perfect Caramelized Topping
The caramelized topping is what transforms crab brulee from a simple dish into an elegant masterpiece. Achieving that perfect, crackly crust takes just a bit of know-how. Here are some tips to help you get it just right:
1. Choosing the Right Sugar
For a traditional caramelized crust, granulated sugar works best. Its fine texture melts evenly under heat, creating a golden, glass-like finish. If you prefer a deeper, richer flavor, opt for brown sugar, but be aware that it may caramelize faster and require closer attention to avoid burning.
2. Using a Kitchen TorchA kitchen torch is the best tool for achieving a flawless caramelized crust. Here’s how to do it:
Sprinkle a thin, even layer of sugar over the surface of your crab brulee.
Hold the torch about 2–3 inches away from the surface and move it in small, circular motions.
Keep the flame moving to prevent scorching and ensure an even caramelization.
Allow the sugar to cool for 1–2 minutes, forming a crackly crust.
If you don’t have a torch, you can use your oven’s broiler. Place the ramekins under the broiler for 1–2 minutes, watching closely to avoid overcooking.
3. Alternative Topping IdeasFor a savory twist, try these topping alternatives:
Parmesan Cheese: Sprinkle grated Parmesan over the brulee and broil until golden and crisp.
Breadcrumbs: Add a layer of seasoned breadcrumbs for a crunchy, savory finish.
Herb-Infused Crust: Combine sugar or breadcrumbs with finely chopped herbs like chives or parsley before caramelizing.
With these tips, you’ll master the art of the caramelized topping, giving your crab brulee a stunning finish that’s as delicious as it is visually appealing.
Serving and Storing Your Crab Brulee
Serving Suggestions:
Crab brulee pairs wonderfully with crusty bread, a refreshing light salad, or a chilled glass of white wine. The richness of the dish balances beautifully with the crispness of these sides.
Storing Leftovers:
To keep your crab brulee fresh, store any leftovers in an airtight container in the refrigerator for up to two days. When reheating, use a low oven or a gentle stovetop heat to avoid overcooking.
Make-Ahead Tips:
For a hassle-free event, prepare the crab brulee in advance by assembling the dish up to the point of broiling. Store it in the fridge and broil just before serving to maintain its creamy texture and golden top.
Conclusion
Crab brulee is the perfect combination of simplicity and elegance, making it an ideal dish for any special occasion. With its rich, creamy texture and delicate seafood flavor, this recipe is sure to impress your guests while being surprisingly easy to prepare. Whether you’re celebrating a milestone or just indulging in a luxurious meal, crab brulee is a wonderful choice.
Have you tried crab brulee before? Share your experience in the comments! We’d love to hear how you served it and any personal twists you added to make it your own.