
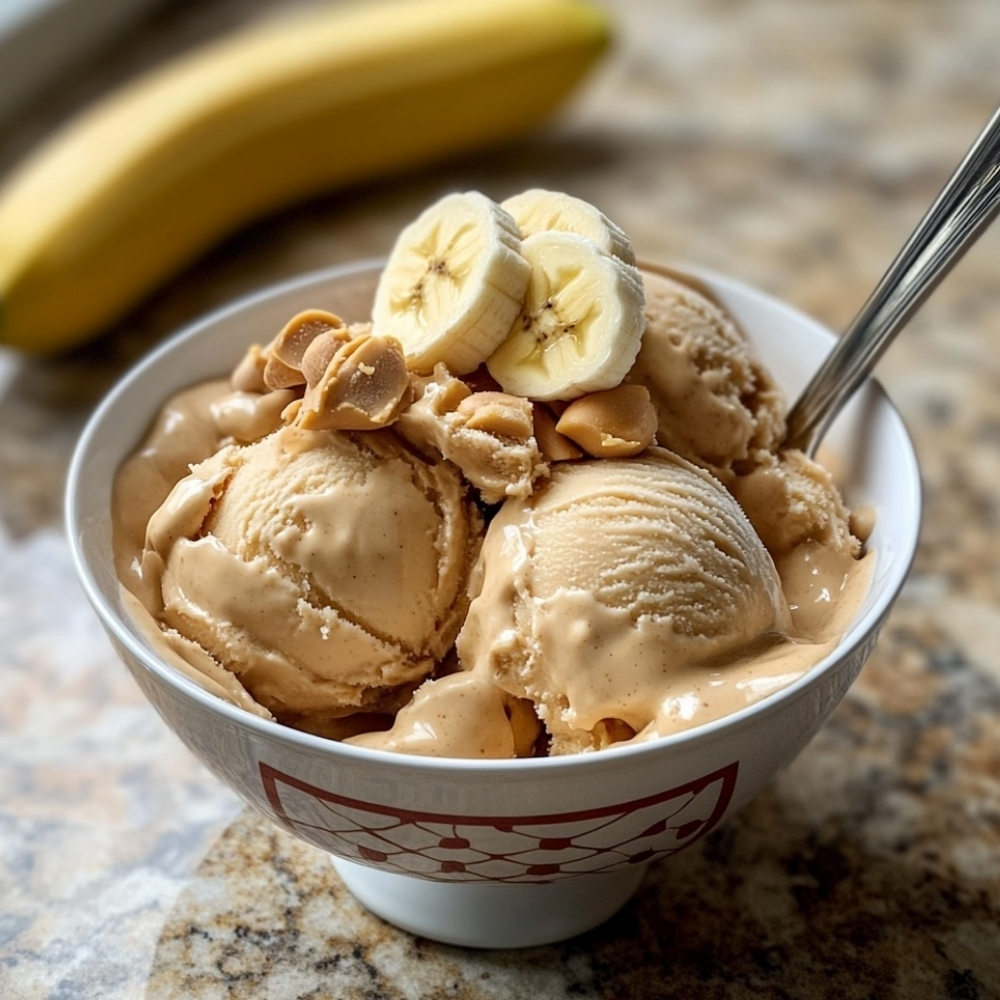
This Homemade Banana and Peanut Butter Ice Cream is the kind of dessert that tastes totally indulgent but is secretly simple and naturally sweet. You get ultra-creamy frozen banana “ice cream” swirled with rich, salty-sweet peanut butter and a hint of vanilla.
Every spoonful feels like a peanut butter milkshake in ice-cream form—thick, silky, and satisfying without needing an ice cream machine. It’s perfect for hot days, late-night cravings, or when you want a freezer dessert that feels special but uses just a handful of ingredients.
Why You’ll Love This Homemade Banana and Peanut Butter Ice Cream
- No-churn & no machine – Just a blender or food processor does the job.
- Naturally sweetened – Bananas bring most of the sweetness; you control anything extra.
- Ultra creamy – Frozen bananas blend into a soft-serve texture.
- Peanut butter goodness – Rich, nutty flavor in every bite.
- Freezer-friendly – Make ahead and scoop whenever the craving hits.
Ingredients
For the Ice Cream Base
- 4 large ripe bananas, sliced and frozen
- 3–4 tbsp creamy peanut butter (no-stir style works best)
- 60–80 ml (1/4–1/3 cup) milk or cream (dairy or non-dairy, as needed to blend)
- 2–3 tbsp honey or maple syrup (optional, to taste)
- 1 tsp vanilla extract
- Pinch of salt
Optional Mix-Ins & Toppings
- 2–3 tbsp mini chocolate chips or chopped dark chocolate
- 1–2 tbsp chopped roasted peanuts
- Extra peanut butter for swirling on top
- Sliced bananas, crushed cookies, or granola for serving
How to Make Homemade Banana and Peanut Butter Ice Cream
1) Prep and freeze the bananas
Peel the ripe bananas and slice them into coins.
Lay the slices in a single layer on a parchment-lined tray or plate and freeze for at least 2–3 hours, or until solid. For best texture, freeze overnight.
Tip: Very ripe bananas with lots of brown spots give the best sweetness and flavor.
2) Blend the base
Add the frozen banana slices to a high-powered blender or food processor.
Pulse a few times to break them up, then blend, scraping down the sides as needed, until the bananas look crumbly and then start to become creamy.
Add peanut butter, 1/4 cup milk or cream, vanilla, a pinch of salt, and honey/maple syrup if using.
Blend again until completely smooth, thick, and creamy, adding a splash more milk only if needed to keep things moving.
3) Adjust sweetness and texture
Taste the mixture. If you want it sweeter, add a bit more honey or maple syrup and blend briefly.
If it’s too thick to scoop, add a tiny splash more milk; if it’s too soft, move on to freezing for a scoopable texture.
4) Add mix-ins (optional)
If you’d like chocolate chips, chopped chocolate, or nuts, fold them into the ice cream base with a spatula rather than blending them, so they stay chunky.
For a peanut butter swirl, dollop extra peanut butter on top and gently swirl it through with a knife or skewer.
5) Soft-serve or freeze to scoop
For soft-serve style, you can eat it right away straight from the blender—it will be like thick, creamy soft ice cream.
For a firmer, scoopable ice cream, transfer the mixture to a loaf pan or freezer-safe container, smooth the top, cover, and freeze for 2–4 hours, until just firm enough to scoop.
Tip: If frozen rock-hard, let the ice cream sit at room temperature for 5–10 minutes before scooping.
6) Scoop and serve
Scoop into bowls or cones.
Top with extra chopped peanuts, chocolate, banana slices, or a drizzle of melted peanut butter or chocolate, if you like.
Serving Suggestions
- Serve in bowls with sliced bananas and a drizzle of warm peanut butter.
- Scoop into cones for a classic ice cream feel.
- Layer in glasses with granola or crushed cookies for a banana-peanut-butter parfait.
- Add a scoop to the top of warm brownies, waffles, or pancakes.
Cook’s Tips
- Use very ripe bananas: The more spotted and soft (before freezing), the sweeter and more flavorful your ice cream.
- Freeze flat: Spread banana slices in a single layer so they don’t freeze into one giant clump.
- Go slow on the liquid: Add just enough milk/cream to blend; too much makes it more like a smoothie.
- High-powered blender helps: A strong blender or food processor makes things faster and smoother.
- Balance the salt: A tiny pinch of salt makes the peanut butter and banana flavor pop.
Variations & Add-Ins
- Chocolate swirl: Swirl in melted chocolate or chocolate hazelnut spread before freezing.
- Chunky monkey style: Add chopped walnuts and chocolate chunks.
- Protein boost: Blend in a scoop of vanilla or peanut butter protein powder (add a bit more milk if needed).
- Nut-free version: Use sunflower seed butter or cookie butter instead of peanut butter.
- Coffee twist: Add 1–2 tsp instant espresso powder dissolved in a little warm milk for a mocha-banana vibe.
Storage & FAQ
- Storage: Keep in an airtight container in the freezer for up to 1–2 weeks for best texture.
- Icy texture? If it gets icy, let it soften slightly at room temperature and re-blend a portion before serving for a smoother feel.
- Can I make it dairy-free? Yes—use non-dairy milk (almond, oat, soy, etc.) and check your peanut butter is dairy-free.
- Too soft? Freeze longer, and make sure you didn’t add too much liquid.
- Too hard? Let it sit out for a few minutes before scooping, or use slightly less freezing time next batch.
Homemade Banana and Peanut Butter Ice Cream gives you a rich, creamy, no-churn dessert with natural banana sweetness and nutty peanut butter in every spoonful. It feels indulgent, comes together with simple ingredients, and is easy to keep on repeat all summer (and beyond).
Homemade Banana and Peanut Butter Ice Cream – Creamy, Dreamy & Easy

Creamy no-churn Homemade Banana and Peanut Butter Ice Cream made from frozen bananas, peanut butter, and a splash of milk—naturally sweet, rich, and scoopable without an ice cream machine. Perfect for an easy, better-for-you dessert.
Ingredients
- For the Ice Cream:
- 4 large ripe bananas, peeled, sliced, and frozen
- 3–4 tbsp creamy peanut butter
- 60–80 ml (1/4–1/3 cup) milk or cream (dairy or non-dairy), as needed to blend
- 2–3 tbsp honey or maple syrup (optional, to taste)
- 1 tsp vanilla extract
- Pinch of salt
- Optional Mix-Ins & Toppings:
- 2–3 tbsp mini chocolate chips or chopped dark chocolate
- 1–2 tbsp chopped roasted peanuts
- Extra peanut butter for swirling
- Sliced bananas, crushed cookies, or granola for serving
Instructions
- 1. Freeze the bananas
- 2. Peel and slice the ripe bananas into coins.
- 3. Arrange in a single layer on a lined tray or plate and freeze for 2–3 hours, or until solid (overnight is best).
- 4. Blend the base
- 5. Add frozen banana slices to a high-powered blender or food processor.
- 6. Pulse to break them up, then blend until they look crumbly and start to turn creamy.
- 7. Add peanut butter, 1/4 cup milk or cream, vanilla, salt, and honey/maple syrup (if using).
- 8. Blend until smooth and thick, adding a splash more milk only if needed to keep the mixture moving.
- 9. Taste and adjust
- 10. Taste the mixture; add more honey/maple syrup if you’d like it sweeter.
- 11. Blend briefly to combine.
- 12. Add mix-ins (optional)
- 13. Fold in chocolate chips, chopped chocolate, or peanuts with a spatula.
- 14. For a swirl, dollop extra peanut butter on top and gently swirl it through.
- 15. Soft-serve or freeze to scoop
- 16. For soft-serve, serve immediately.
- 17. For scoopable ice cream, transfer to a loaf pan or freezer-safe container, smooth the top, cover, and freeze for 2–4 hours until firm.
- 18. Serve
- 19. If very firm, let sit at room temperature for 5–10 minutes, then scoop into bowls or cones.
- 20. Garnish with extra toppings as desired.
Notes
Use very ripe bananas (spotted) for the best natural sweetness and flavor.
Don’t add too much liquid or the mixture will be more like a milkshake than ice cream.
If your blender struggles, let frozen bananas sit at room temperature for a few minutes to soften slightly before blending.
For a stronger peanut flavor, add an extra tablespoon of peanut butter or a pinch more salt.
Nutrition
Calories: ~220–260
Protein: ~5–7 g
Total Fat: ~9–12 g
Carbohydrates: ~32–36 g
Fiber: ~3–4 g